We are all inventors, each sailing out on a voyage of discovery, guided each by a private chart, of which there is no duplicate. The world is all gates, all opportunities.
Ralph Waldo Emerson

Friday, April 30, 2010

Interesting...


Just read an article that states research shows our sleep positions can say volumes about personality. I sleep half the time in the 'Freefaller' position and the other half in the "Fetus" position. Here are their definitions:
Freefall position - Those people who lie on their bellies with arms under or wrapped around a pillow with head turned to the side, make up 7% of the population studied. Freefallers are brash, outgoing, and are very uncomfortable with criticism.

Fetus position - A whopping 41% of participants sleep in this curled-up manner. Women are twice as likely to rest like this and it is listed as the most common position. These sleepers are said to have a tough exterior but are still sensitive and may appear to be shy but warm up quickly.

Ha! Wow, I hope their wrong! Ok, in all seriousness,I'd like to know if your sleep position matches your personality. How does this study categorize you? Is it correct? I'm not sure which I'm supposed to be. How can I be brash and shy at the same time? Ah well, I guess it's something I'll have to ponder as I stare down my critics in a sensitive manner :)

New Redbox FREE Movie Codes!


Ok, so I was searching the web for deals and found more coupon codes you can use at Redbox locations to get a FREE one night movie rental! There were no expiration dates posted, so I'm hoping we get to use them before they're no longer valid. Happy movie watching!


DVDONME

DVDATWAG   Still valid from last time! (use at Walgreens locations only)

BREAKROOM

REDBOX       This one is only good for first time redbox customers

Thursday, April 29, 2010

Spa Night: Rice Water Toner 4/29/10

Can you believe that I might have had one of the oldest beauty secrets in my kitchen all my life and never knew it? I've been researching ancient beauty techniques and what people in different cultures use from their kitchens for skin care and wow, how have I never heard of a Rice Water Toner? It is so easy to make, too! And apparently has a world of benefits. So, to this day, in many Asian households, when the daily pot of rice is made, a cup or two of the rice water is set aside for the mother or daughter's nightly face washing. Interesting! I think it's pretty awesome. I've read that with long time use it can brighten skin, even out skin tone and tame oily patches. That's great news for my uneven, oily skin! It also has a reputation for lightening freckles, but I think that may be a myth. Would be nice, though, if it could remove freckles. I have lots of those! The best versions use organic rice, but um, yeah, that's a little too pricey for me. I still wanted to try it, just with regular rice. Here's what I used:

Rice Water Toner
White rice
Rice pot
Warm water
Ladle
Container with lid

Directions
-Add rice to rice pot.
-Cover with about 1 inch water.
-Swirl rice around until the water gets cloudy
-Let sit 5 minutes.
-Ladle rice water into container.
-Keep covered in fridge for 1-2 days.
-SHAKE WELL before each use. -Apply to clean face and neck and let dry. May be used before makeup application and after makeup removal.

Optional: I added 2 drops of tea tree oil before placing in the fridge. Tea tree oil is a natural antibacterial so I'm hoping it will fight the bacteria and make the toner last longer than 24 hours.  At least until I make another pot of rice! I'll let you know if it works :)

Look how much rice water could be collected from rinsing one pot of rice! Wow. If it could last longer, this would be the cheapest kitchen beauty treatment ever!

There are so many more sophisticated Asian beauty products that can be purchased that offer beautiful results. But rice water caught my interest because the cost is so reasonable (we always have rice!) and it's still being used by people today.
Oh yeah, after squirreling away the water, don't forget to add more and cook the rice!

Wednesday, April 28, 2010

Tutorial Tuesday: Homemade Coffee Creamer 4/27/10

Had this post ready when we still had a car, so even though I missed Tutorial Tuesday, I figured I'd post it anyway.
We use a lot of creamer around here and since finding out that powdered creamer is flammable, we've switched to liquid. Thanks to my brother, who made me aware of that fact, I'm now contemplating how much coffee flavored lighter fluid I've ingested. *gag* . Haha!  The trouble is, the liquid stuff doesn't last as long for us and it's way more expensive, so I decided to try making some.

Vanilla Dream Liquid Coffee Creamer. Ha! Figured I would try to make it sound posh.

2 cans evaporated milk
2 cups milk
2 Tbs vanilla extract
3 Tbs sugar

Directions
In a large bowl, whisk all ingredients until well combined and sugar is dissolved.


Pour into a measuring cup to make it easier to transfer to your creamer bottle.  Store in the fridge in a covered container (I just used an empty half gallon milk jug). Shake well before each use.

It tastes pretty good!

This recipe gave us 4 cups of creamy vanilla goodness for our coffee.

I made another batch about a week later:

Mocha Mambo Liquid Creamer. Because it Mambos with the coffee already in your cup. Oh yeah, it's a coffee party ;)

1 can evaporated milk
1 can condensed milk
1 cup regular milk
2 tsp instant coffee

Mix all ingredients until well encorporated. Place in your container of choice and store in the fridge! That's it.
 This made just over 3 cups of mocha creamer :)


Yes, I'm crazy. I made coffee flavored coffee creamer. But you know what? It tastes awesome! I think I'll use condensed milk every time now since it allows me to save sugar for other cooking. Plus, it made the new batch a little thicker like 'real' creamer. I'm going to have so much fun making different flavors!

I'm guessing it's only good as long as the regular milk is fresh. We just bought the milk and the expiration date is in less than two weeks, so that's when we'll check if it starts to smell snarky.

Saturday, April 24, 2010

Just a Little Bruised...

Yesterday Baby Boy and I were in a car accident. We lost our car and are so overwhelmingly thankful for the amazing firefighters who pulled us out of our flipped over car and made sure we were okay. It all happened so quickly and we had a real scare. One thing I'm newly appreciative of is our wonderful family and close friends. We're so blessed to have such beautiful souls in our lives who love us so much! I keep finding new bruises and am so amazed they are all I suffered. I definitely believe Someone was watching out for us. Thankfully, Baby Boy came away with barely a scratch. My brave little man who never cried, even when we found ourselves suddenly slammed by another car and losing all sense of direction as we rolled over in a fury of smoke and shattered glass. Seatbelts are such a simple thing, but I'm so glad we had them. I think our good old straps and buckles kept us from getting seriously injured. I see everything with new eyes. Things that seemed important are no longer top priority. I am reassured that the little things I've come to treasure are truly important. They are what matter. The people in our lives who we love and who love us: they matter. Others whom I've tried to please. Others who have judged me or my family and I've tried to judge back: none of that matters. I can't afford wasting time and life worrying about what they think or how I can repay their unkindness. I hadn't even realized I was doing that, but I was, in little ways. I hope to always have the clarity of thought I have right now. I love my family, my Lord and the life I'm blessed to be a part of. That's what is truly important.

Thursday, April 22, 2010

Spa Night: Homemade Egg White Toning Mask

Ready for some pampering? I am! Tonight I'm doing another Olive Oil Deep Conditioning Treatment, a pedicure and an Egg White Toning Mask.

Here's my recipe for an Egg White Toning Mask so you can try it yourself. This is great to perk your skin up for an event, date, or family photos. Use a few hours before your event for glowing, firmer skin with or without makeup. For regular skin care, may be used once a week. When pressed for time, I use the egg whites lightly beaten, not thick enough to form peaks. The benefit of whipping it, though, is that the chances of egg white dripping down your neck as it dries is greatly reduced. Bottom line: whipped or lightly beaten, the end result is the same. Tightened pores and smoother skin.

EGG WHITE TONING MASK

Ingredients:
Favorite cleanser
Favorite face scrub. One of these days I'll post my recipes for sugar and salt scrubs.
Facial moisturizer
1 cold egg. I like it cold because it feels soothing on my skin.
Electric mixer. Because I'm lazy and will not hand whip this mask!
Vanilla extract. If the thought of smelling raw egg whites on your face makes you squeamish.


Directions:
-Cleanse face thoroughly.

-Exfoliate skin with scrub. Rinse. Pat dry.

-Separate egg yolk from the white. You will only need the white for this toner.

-In a medium bowl, whip egg white until it's all frothy. If the smell really bothers you (it bothers me some times more than others) this would be the time to add one drop of pure vanilla extract for a more pleasing scent.

-Apply to clean face and do something relaxing while your mask dries. I usually put on some music and curl up with a book.

-Rinse thoroughly and pat dry. You've got to touch your skin to believe it! It will be smoother, tightened and refreshed.

FUN FACTS

-Over time, this mask can help your pores appear less visible.
-Add 1 tbsp of honey before whipping to create a mask that can heal as well as tighten. 
-Honey is a natural antibacterial, helping any open blemishes to heal and with continued use, is great for unclogging pores.

Now, obviously, taking care of a very active little boy and the normal routine of running a household doesn't always add up to uninterrupted blocks of time for spa treatments. Because I'm generally in a better mood the rest of the week when I take time for myself, I use what I have. And that usually means breaking up the time I use into realistic increments. For instance, today, when Baby Boy went down for a nap, I did the Hot Oil Treatment and Egg White Mask. I have other things to get done for the remainder of naptime so, I'll leave the pedicure for later on tonight when Little Man's down for the night. That way neither Baby Boy, the house, or I suffer :) Anyway, just thought I'd throw that out there to encourage you to make time for yourself because the relaxation is worth the effort. Happy Spa Night!

Happy Earth Day!

Click here to read an article about all the free stuff businesses are giving away today for Earth Day! That's a great way to kick off your Earth Day celebrations. Too bad we're stuck inside today, I was hoping to get that Origins deal. Ah well. It's Leftover Night and I don't have to worry about dinner! I hear some projects calling my name. Stay tuned for a Spa Night post!

Wednesday, April 21, 2010

My Review of Pintuck Tee

Originally submitted at OneStopPlus

  • Gathered Pintucks in front
  • Banded ¾length sleeves with shirring.
  • Straight hem.
  • Cotton/polyester. 
  • Machine wash.
  • Imported
  • Sizes: M-5X


HUGE fit, but nice bright color

By Siva Mama from Joplin, MO on 4/21/2010


3out of 5

Neck Size: Feels too big

Sleeve Length: Feels too long

Chest Size: Feels too big

Pros: Very Comfortable, Breathable

Cons: Too big, Poor Fit

Best Uses: Travel, Casual Wear

Describe Yourself: Conservative, Dressy Casual, Stylish

Just received this and it's huge on me. Because of other reviews, I ordered one size down from my regular size and it's still really big in the arms, chest and hips. I got it on clearance so there's no use sending it back. It's ultra comfy and the pink color is pretty. After a little tailoring it should be great for casual dressing. Love the detail on the neckline! The only downside is the fit, but order a size or two down and you should be fine.

(legalese)

All New

Woohoo! New mineral makeup! The other day, I ordered some free samples from EveryDayMinerals.com and they just arrived. I LOVE makeup :) And since I found this website I've been slowly trying different samples to see what colors suit me. They have a pretty good variety of paraben free mineral makeup.
Aren't these colors gorgeous? Good stuff! And I only had to pay shipping. Now to decide what I really like so I can order the full sizes.

The left row is finishing powders and the right row is eye shadow.

Oh, yeah...... Just to let you know, I'm a little distracted right now. With my fabulous new birthday gift. My sweet man! I don't officially get older for five months, but he said he wanted me to have it now. I've been dreaming about having my own for a while now........

Tuesday, April 20, 2010

Tutorial Tuesday: Homemade Hot Oil Treatment & Vinegar Shine Rinse

More spa goodies out of your kitchen cabinets! I decided to post this because of a request for it, and also, my hair is in sore need of a treatment. So here are my absolute favorite treatments for dull, dry scalp and hair. There are fancier recipes around, but I love these because they work for me and the ingredients are relatively cheap. Gotta love a great deal on feeling pampered!

Vinegar Shine Rinse
This needs to be prepared either ahead of time or while you let the oil treatment set because you'll need it for the last step of this treatment.
Ingredients
1 cup water
1 Tbs apple cider or white vinegar

Pour both ingredients into an empty bottle and shake to combine. Set aside for later. This is the rinse recipe doubled so I have extra for later in the week.
FUN FACTS

-Vinegar closes hair's cuticles (keeping it from absorbing excess dirt) and removes scaly buildup leaving hair smooth and shiny. It also promotes circulation in the small capillaries essential to healthy hair growth.
-The vinegar rinse can be kept in your shower and is safe to use once or twice a week after your normal shampoo for shiny, residue free hair. Over time it helps control dandruff as well.


Hot Olive Oil Deep Conditioning Treatment
Ingredients
1/2 cups of extra virgin olive oil
1 Tbs dried rosemary
DO NOT ADD ROSEMARY IF PREGNANT OR NURSING. Large quantities of this herb could cause vomiting, nausea, and muscle spasms in women who are pregnant or breastfeeding. The hot oil and vinegar rinse will provide more than enough conditioning and shine for hair.

Pour extra virgin olive oil into a saucepan. Add dried rosemary, stirring in slowly. Place the pan on the stove and heat over medium heat until the oil is warm. I set a timer for 2 minutes and then remove it from heat. You want the oil very warm, not scalding hot.

Strain through a paper towel to remove rosemary.

Coat hair from the scalp to the ends with mixture. For oily hair, use more on the shaft and ends and a small amount near the scalp. For extremely dry hair, saturate everything including scalp. For either hair type, pay special attention to hair ends.

Twist hair upon itself on top of your head and wrap in plastic wrap or shower cap.

Heat up a damp towel in the microwave until very warm (about 2 minutes). Towel should be steamy but not scalding hot. Wrap the hot towel around your head and let the oil treatment do it's magic for 20 minutes.
 
Remove the towel. Remove and discard plastic wrap. Wash your hair twice with a mild shampoo (when I say mild, I mean no Head & Shoulders) to remove all of the oil. Rinse the first shampooing out with very warm, almost hot water. Rinse the second shampoo with slightly warm, almost cool water. Going immediately from hot to cold water always gives me a huge brain freeze type headache so I don't do it.

For your final step, saturate hair with the vinegar rinse mentioned earlier. Let sit for 1 minute. Any longer and it might have a drying effect. Rinse with cool water until vinegar smell is gone. Cold water seals the hair shaft and locks in shine.

FUN FACTS
-Olive oil is an amazing natural moisturizer. It also works great as an all over body moisturizer on damp skin fresh out of the bath.
-Rosemary has been used throughout history in home therapy to deepen natural hair color
 -If it's the first time in a long time that you've done a deep conditioner, you may want to do the treatment once a week until you get your hair where you want it. Then you can deep condition only when you need it. Most people only need it once or twice a month.
Can you see the difference? I can! My hair doesn't look like it was abandoned in the desert anymore. It even feels better.

Before. Dried out and frizzy.
 After. The lighting's not so great, but you can immediately see that the hair is moisturized and there's zero frizz. If you could see it in person, you'd notice there's a HUGE change in deeper color and lots of shine. Try it and see!


Happier endings :) Still need trimming, but they're not dried out anymore.

You'll love your shiny, soft, dandruff free hair! If you try these recipes, I'd love to know how they work for you. Now that you have the recipes you can head to the store and grab whatever ingredients you don't have on hand in time for your next Spa Night. Enjoy!


Disclaimer: All homemade beauty products and results are based on my own use and experience. The facts included about these cupboard products are only a few benefits, there are many more amazing things they can add to at home skin/hair care. These are simply the reasons I started using them in the first place. Use responsibly. I cannot be held responsible for any allergic or adverse reactions experienced while using recommended ingredients.

Monday, April 19, 2010

Bath & Body Works Coupon Codes


I'm signed up for B&BW newsletters and just got these codes!

Use code VANILLAS to shop online and get $10 off a purchase of $30 or more.
To get the same deal in stores use code 2311  (US stores only).

Also valid only in the US:   Use code FREESHIP60 at online checkout on any purchase of $60 or more.

Click here to print the coupon before you go to the store. 
Sign up on Bathandbodyworks.com to receive free coupons and a newsletter with their latest deals!

Makeover Monday

Start out with a functional, but slightly dysfunctional piece of furniture that you love. In this case, a very useful key/coat hanger that is missing two mirrors. I bought it that way at a thrift shop 3 years ago and never made up my mind what to fill in the spaces with. Enter the gorgeous tropical scraps my wonderful mom sent me.

Et Voila!

Shine it up, hang and enjoy :). I really like how it turned out. I can't believe I waited so long to do anything with it.
Dinner tonight is pan fried pork and onions with brown gravy, rice and green beans.
And for dessert........... cheesecake and whipped cream. I just remembered we had some strawberries left! Mmmmm.....
The mixer left a weird pattern in the whipped cream. I even took it to Hubby so he could see the whipped cream goggles :)

I got a few more boxes unpacked and got many sweet snuggles from Baby Boy. It's shaping up to be a great week.

UPDATE: 8/1/2010 I'm linking to


Saturday, April 17, 2010

Weekend Brekkie: Pani Keke Samoa and Strawberry Yogurt

Samoan pancakes are always a breakfast favorite around here! I made these the other day when Hubby was home, but saved the photos for this post :) I started cooking and Hubby asked what I was making. I said "Just pancakes". Later, he came in the kitchen and peeked at the stove and said "Those aren't pancakes. It's Pani Keke! Mmm." Haha. My island boy at heart.

Pani Keke Samoa
  • 3 ½ Cups Flour
  • 1 Cup Sugar
  • 2 teaspoons baking powder
  • 1 ½ Cups Water
  • Abt. 3 ½ Cups Vegetable oil

Combine dry ingredients and water, folding together until well blended. My mix turned out a bit dry this time, but usually that amount of water is just right.
Heat oil and test with a tiny drop of dough. When dough immediately rises to the top, the oil is ready. If the dough drop burns, reduce the heat and wait a few minutes for the temperature to lower and test again.

One trick I learned from making this a lot is to dip the spoon in the hot oil before scooping the dough. It makes it much easier to slide the dough into the oil.
Cook until keke is golden brown. When a skewer inserted in the center of keke comes out clean, it's ready to be placed on a draining station. I usually use a layer of newspaper covered with a few layers of paper towels on a platter.

Baby Boy loved it and kept coming back in the kitchen for more. Pani keke are best warm. American versions coat the keke with cinammon sugar before serving on ice cream. Personally, I love them with butter, jam and a hot cup of coffee.

Natural yogurt (plain) with fresh strawberries and honey. So good! I'm going to try making crock pot yogurt sometime. Baby Boy and I are watching Disney cartoons and hanging out. Happy lazy Saturday!

Friday, April 16, 2010

Day Out with the Kids!


You can take your kids to a local Lowe’s Store this Saturday, April 17th, at 10AM for some shop class fun! Kids can build a FREE See It Grow Planter; Each participant will receive a free apron, goggles, a project themed patch, and a certification of merit upon completion of their project! Click here to register.
(Thanks, WhoSaidNothingInLifeIsFree!)


Another cool family fun event is taking place at your local Toys R Us Store on Saturday, April 17th, between 11AM-1PM for a Thomas & Friends Play Date! Enjoy storytime, coloring fun, Thomas trivia, special offers and FREE gifts. Note this event is intended for children ages 3 and up.
Also, you can print this coupon here for $5 off Mega Bloks Thomas & Friends Busy Day at the Quarry Playset. This coupon is ONLY valid on Saturday, April 17th!
(Thanks, HappyClippings!)

Thank, Hip2Save for these deals!

Thursday, April 15, 2010

Crafty Day & Spa Night

Unpacked a box yesterday and found a postcard I received 3 years ago from my sisters. I loved it so much that I saved it, propped up on my dresser. I decided to give it a new life in a mini shadow box.

To the left is a frame whose glass broke during packing. I was sad, but I knew I could use it for something else. And there's the beautiful mosaic postcard my sisters made for me. The turtle is made of different pieces of colored paper covered with glitter. I love the colors and I LOVE turtles, so I just had to make sure I could enjoy it longer.


I placed the frame on the card and cut so the turtle would be off kilter. Don't know why. I just liked it. I also love the bubbles near the turtle's head so I adjusted it so a few could be seen in the frame.

After spraying both the frame and newly pared down card with an acrylic sealer and letting them dry, I secured the turtle in the frame. For the last step, I cut a piece of blue foam sheet to fit the frame and glued it to the back.

It's up on the wall now. My beautifully personal shadowbox :) I couldn't get the photo to show just how vibrant and gorgeous the turtle's colors are. Trust me, it looks amazing. Hubby saw it when he came home last night and asked, "Where'd we get that picture?". Ah. Success!

Now for the spa part. I just whipped up a face mask and after rinsing, my skin feels baby soft, so I thought I'd share the easy recipe:

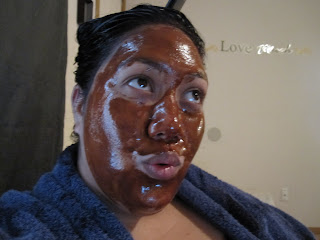
Chocolate Honey Mask
3 Tbs honey
1 Tbs unsweetened cocoa powder

In a small bowl, mix ingredients until consistency is smooth. There will be air bubbles.


Apply to face, massaging into skin. Leave on for 20 minutes. If you get bored because you also happen to be waiting on the dishwasher to get done while dyeing your hair, you could always whistle. Ha!


Remove with warm water. Seal your pores with a final rinse of cold water.
Apply toner and moisturizer and you're done! Enjoy your unbelievably soft skin.

I used a homemade sugar scrub before using this mask, but if you're short on time and want to eliminate the extra time spent on the scrub but still get the benefits of a good scrub (like removing dead skin cells), just adding one more ingredient to the Chocolate Honey Mask can help.

1 Tbs dry oatmeal. That's it! Oatmeal.


When you massage the mask into your skin, the oatmeal will act as a natural exfoliant and soothe your skin too! Honey is a natural antibacterial, helping any open blemishes to heal and unclogging pores. The chocolate powder contains natural antioxidants and supposedly protects your skin from damaging free radicals.

Spa Night in general helps me unwind and destress. Do you need a little relaxation in your day? Try this simple mask and leave the stress behind for a few minutes. If nothing else, you'll feel pampered and you'll see the improvement in your skin. Plus, this mask smells divine!

Wednesday, April 14, 2010

Tax Day Freebies April 15, 2010

Here are some of the freebies and discounts on offer for tax season 2010.


-- FREE COFFEE AND TREATS
CINNABON: Get two free bite-sized cupcakes from 6 p.m. to 8 p.m. Thursday at participating mall locations as part of "Tax Day Bites!" Flavors include Chocolate Passion, 24-Carrot Cake, Vanilla Bliss and Cinnacake Classic.

MAGGIEMOO'S: Get one free slice of ice cream pizza -- ice cream with red frosting to look like sauce and white chocolate to look like cheese -- at participating locations from 3 p.m. to 7 p.m. Thursday.

STARBUCKS: Get free brewed coffee all day Thursday if you bring your own mug, a promotion the cafe chain says is friendly to the environment as well as taxpayers.

-- DISCOUNTED MEALS
BOSTON MARKET: For a "last-minute tax break" -- one free meal for each one you buy Thursday through Sunday -- print out and show this coupon for this freebie!

IHOP: Expanding on the tax deduction parents get for kids, the restaurant chain is offering free dinner for one child age 12 or younger with each adult meal purchased 4 p.m. to 10 p.m. all month long.

MCCORMICK & SCHMICK'S: The seafood restaurant is offering $10.40 dinner and drink specials in the bar on Thursday -- a nod to the 1040 tax form. Bar guests who come in April 15 also receive a $10.40 gift certificate for a later visit. And professional tax preparers, who may have to work right until the midnight deadline Thursday, get their freebie Friday: dessert on the house plus a $10.40 certificate if they show a business card.

P.F. CHANG'S: Get 15 percent off food purchases for dine-in or take-out, excluding alcohol and happy hour food and beverages.

-- STRESS RELIEF
HYDROMASSAGE: Get a free massage Thursday through Sunday at participating locations. The mall-based massage chain suggests calling ahead to book an appointment. Find a location at http://www.hydromassage.com/taxday.

The original article with this info can be read by clicking here.

I've highlighted the deals I'm most likely to take advantage of. WOOHOO, Starbucks!!

Tuesday, April 13, 2010

FREE RedBox Movie Rental


Looking to rent a movie?
Use one of these codes to get a FREE 1 night rental at RedBox locations:


42HY4V8E
DZSQ5G6
DVDATWAG (Walgreen’s Locations)
DVDKROG (Kroger Locations, & Fred Meyer)

Thanks to Shopping With Cents for the heads up!

One Stop Plus Coupon Code!

You still have 1 day to take advantage of an amazing coupon code on OneStopPlus.com. Use code RDFAN to take $20 off a purchase of  $20 or more. ** SORRY, THIS CODE IS NO LONGER VALID ** I just made a purchase with the code and got an awesome deal! Here's the breakdown of my order:

1 peachskin blouse  Reg: $9.84 . TTL after coupon = $0.70
1 pintuck tee                   $8.69.  TTL after coupon = $0.61
1 pair panties                  $2.99.  TTL after coupon = $0.21
 
Add $5.99 standard ground shipping.
Order TOTAL: $7.51!

So, curvy guys and gals, take a look at their clearance and snag yourself a really great deal!

There are some restrictions, so read them over before you checkout:

May be used one time only per customer. Applies to merchandise only, not including shipping and handling or taxes. Not useable for cash. Not valid for prior purchases or charges. May not be used for home & kitchen items, handbags, Skechers Shape Ups, costumes & costume accessories. Ulla Popken items or gift cards & e-gift cards purchased on OneStopPlus.com.Cannot be combined with any other offer.** Offer ends Midnight Thursday, 4/15 EDT

Thanks for the tip, Heather at My Sweet Savings!

UPDATE: Blintzes

Made blintzes for the first time using the recipe I posted earlier. They are SO GOOD! You've got to try making them!


Our blintz making station :) The fresh strawberries are beautiful this year! I just had to bring some home for a compote. See our blintzes in the platter on the left? Near the end, I was able to get them round and pretty. Practice makes perfect.

 Here's a closeup of one of the prettier ones ready to serve with compote and sour cream. The sour cream made all the flavors so much more intense. I was surprised, but it was quite nice. The blintz filling was so rich and creamy! I actually used one package of regular cream cheese and one package of Neufchâtel cheese. The Neufchâtel actually tasted better to me than the cream cheese. Surprising, because it's 33% less fat than cream cheese. Next time, I'll just use two packs of Neufchâtel.

I love trying new recipes! Some of them are disasters, needing a more talented hand, but I was so happy with how these turned out, especially after hearing how tricky blintzes can be. Letting the batter rest before cooking seems to be the key. I'm glad we took that advice. Good advice makes for yummy brunch :)

Tutorial Tuesday: Homemade Facial Toner

I
 like to make my own facial products when I can. Every Thursday, which I have claimed for my personal Spa Night, I use different homemade products depending on what I want to do that particular evening. Some Thursdays, I sprinkle homemade moisturizing bath salts into my foot soak, followed by a homemade foot scrub before I treat myself to a pedicure. I almost always do a homemade face scrub and mask on Thursdays, and like to do a deep conditioning oil treatment on my hair twice a month, but I'll save those recipes for a later post. Since the move, I haven't really made the time for my Spa Night and I can see the negative effects in my skin and hair. Today, I wanted to post one of my favorite homemade toner recipes. There are a lot of recipes out there but I like to use a tried and true mixture that works amazingly well for my crazy combination skin.

This is a recipe for a liquid toner that is meant for daily use. I just made a batch (my first in a long time) and it feels amazing on my stressed, broken out skin. Once my skin clears, I know this toner will help to keep it that way.

DAILY HEALING TONER

Ingredients:
3/4 cup Witch Hazel (available in the pharmacy section at WalMart near the rubbing alcohol). Witch Hazel will eventually help to tighten and reduce the appearance of pores so there will be less chance of clogs and damage to your pores.

2 drops of Tea Tree oil. Effectively treats and promotes healing in infections (pimples, blemishes). I got mine at Hobby Lobby for $6.

Water

1/4 cup Green Tea. It has healing, and supposedly anti-aging properties and soothes my irritated skin.

2 Tablespoons Apple Cider Vinegar or White Vinegar. A natural astringent for cleansing gunk from your pores, but gentler than the chemical kind.

Favorite moisturizer

Directions:
-Boil water and steep 1/4 cup of green tea. Set aside to cool.

-In a bottle of your choice, add cooled green tea to witch hazel.

-Add tea tree oil and vinegar. Shake well.

-Apply to freshly cleansed face and neck with a cotton pad or clean washcloth. Let dry and apply moisturizer.

-Store in refrigerator. Shake well before each use. Great to remove excess oil throughout the day, after exercise, etc. Normal use would be once or twice a day, but especially at night after cleansing.

My toner made with this recipe. Fresh out of the fridge, shaken up and ready to apply.

I'll be sharing more of my homemade spa recipes in the future. Hope you get to try this! It's economical, all natural and doesn't have any harsh chemicals in it. I'm not an expert, but I have been using my own products for a long time and have loved the results. If you have any questions for recipes for different types of skin or a particular beauty problem, ask me and I'll do my best to find the right combination of ingredients for you. Happy Tuesday, people!

Monday, April 12, 2010

Weekend Brekkie: Blintzes

Does anybody have an easy blintz recipe that you've tried and liked? I've only had blintzes or crepes a handful of times in my life, but for some reason, I can't get them off my mind! I found the following recipe and photo online. Don't they look great?


The Shell:
    4 eggs1 ½ cups of flour1 ½ cups of milk½ teaspoon salt2 tablespoons sugar

Beat the eggs and milk together. Then gradually sift in the flour, salt and sugar. The mixture must be thin and so if it happens that it comes out thick, add a bit more milk.
Melt margarine in a large frying pan and when hot, put about 3 tablespoons of the batter into the pan, tilting the frying pan to make the blintz thin. Cook each crepe-pancake until it just begins to brown and slide out of pan on to a waiting plate. Put the cooked side up to receive the filling.
 

Filling:
This should be prepared before the shell so that it may be added when the shell is ready.
    2 packages of light cream cheese of your liking 2 egg yolks mixed well3 teaspoons of melted butter6 teaspoons of vanilla flavored sugar 1 pinch salt

Mix filling ingredients together until they are smooth.

Place a heaping tablespoon of the filling in the center of the crepe-pancake. Fold over from the four sides to protect the filling from leaking out. Roll over to seal blintz; it should look like a flat cigar.

At this point the blintzes may be fried to be served now or frozen for later consumption.
To serve they must be fried again in margarine until the shell is a golden brown. If you want to enhance an already great delight, mix sugar and cinnamon together and sprinkle on top of the blintz. Even better, put it in a small bowl so that the individual eater may decide for him/herself how much he desires. Or it may be served with jelly.

This recipe should give you about 15 to 18 blintzes
UPDATE: My brother tried this recipe and they didn't quite turn out. Because of his experience and recommendations, I found an article where I got the following information that will maybe help when try the recipe:
Many cooks meet their downfall when preparing the blintz, because the blintz very frequently sticks to the pan or fails to cook properly. Cookbooks recommend using a crepe pan so size is controlled. Overfilling the pan is a common mistake. Only about two or three teaspoons are needed to cover the pan and create a thin blintz. A nonstick or well-oiled pan that is properly heated can also make flipping and removing the blintz easier.
Other recommendations for preparing the blintz suggest allowing the batter to sit for at least thirty minutes prior to cooking. The batter can also be stored in the refrigerator for up to two days. When the batter has a resting period, the wheat becomes less glutinous, resulting in a thinner pancake.
When filling the blintz, most cooks recommend waiting until the pancake has fully cooled. The filled blintzes should be added to a hot pan, and cooked first on the fold side.
Blintzes should be served hot. The fruit variety is especially good when a dollop of sour cream is added.

I'm trying this for our next weekend breakfast. I'll post whether it turns out or not. Here's hoping! Happy Monday, all!

Start Swagging!

Recommended reading and other products...