We are all inventors, each sailing out on a voyage of discovery, guided each by a private chart, of which there is no duplicate. The world is all gates, all opportunities.
Ralph Waldo Emerson

Showing posts with label homemade. Show all posts

Saturday, April 2, 2011

Homemade Interchangeable Flipflop Bling

So the other day I was in a boutique and saw a thing called Switchflops, which are basically flip flops that have a metal snap where you can place decorative flowers or faux jewels on your flip flops depending on your outfit. Well, I thought I just had to have some, but wasn't going to pay $20 and up for them. I've racked my brain until I came up with a homemade solution and now I cannot wait until the warm weather sticks around so I can show them off! Also, I've got visions of flip flop bling made out of fashion jewelry... but I'm getting ahead of myself.

If you've already done this for yourself, my cheap creative heart salutes you. And why didn't you tell me???
;-) Here you go homemade divas. Enjoy the endless possibilities to prettify your flip flops and show off your pedicure this spring and summer!


Here's the type of glue I use for all my projects. It's amazing! Once it dries it's permanent, waterproof but flexible. Perfect for hair or flipflop bling :)


I started out with 2 pairs of plain flip flops. They're on sale everywhere! Big Lots has them for $2 a pair and Old Navy is selling tons of colors and sizes for $2.50 a pair if you buy 2. I can't get them at WalMart because I have a latex allergy and theirs always seem to make me break out in hives, but anyway.....

Place a line of glue on the underside of the straps in this area.
Let the glue cure for 1 or 2 minutes until it becomes tacky.

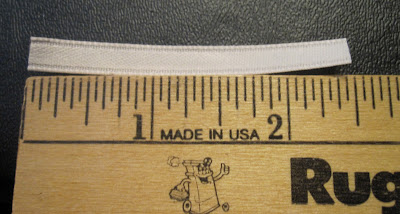
Measure and cut a 2 1/2 piece of ribbon. This will work for larger feet which I *ahem* have. You can measure and figure out what length you need once you see what it's for.
You'll need 2 precut pieces of ribbon for each flip flop.
So I cut 8 for my two pairs of flip flops.

Place one piece of ribbon on the underside. Be sure only half the ribbon is glued to the underside. The other half will need to wrap over to the top.

Here's how it should look from the top after you apply the ribbon to the glue underneath.

Place a dab of glue on the end of the ribbon...

And fold it over the top. Press firmly into place. Repeat on other side so ribbons overlap each other.
You'll have a ribbon X with ends glued down and no glue in the center. We need the top center to stay glue free so you can add your bling.

Clamp into place with clothespins or whatever you have. I used alligator hair clips because I have a ton.
Let cure for 24 hours for best results and then remove clamps.

I made a few 2 inch flowers to personalize my flip flops. They're attached to alligator clips. I'd like to find smaller clips than these next time, but it's what I had.

Place the bottom of your clip through the unglued loop we created with the ribbon pieces.

Oh the pretty frilly girly possibilities!


So yeah... now I'm on the lookout for brooches and clip on earrings in the clearance sections to add more bling to my flip flops!

Hope you are inspired to make some pretties for yourselves, Beauties! Have a wonderful weekend!


Friday, February 11, 2011

Homemade Way To Keep Cut Flowers Looking Great


Check out this helpful article with great tips to help make your Valentine's cut flowers last!

Tuesday, December 7, 2010

Homemade Holiday Spice Mocha

Our Christmas countdown is quickly turning into the Twelve Days of Coffee. And I'm not complaining :)

Today, I woke to find my sweet Hubby had left half a pot of coffee for me. YES! I love my coffee and appreciated the thought, but I couldn't help being a little bummed because I had been walking to the kitchen with visions of different spice combos to sprinkle into my coffee grounds that morning.
Then inspiration hit and I am now completely content as I sip on my Holiday Spice Mocha while Baby Boy watches his morning cartoons.

Here's the non-recipe:

Homemade Holiday Spice Mocha
Coffee
Powdered hot chocolate
Cinnamon
Nutmeg
Whipped cream


-Pour a mug of freshly brewed coffee.
-Add powdered hot chocolate to taste and sugar if needed. I added a BUNCH of hot chocolate because it smelled so good!
-Sprinkle nutmeg and cinnamon to taste. Stir well.
-Top with a dollop of whipped topping and sprinkle a little nutmeg and cinnamon on that as well.

Enjoy your rich cup of homemade mocha :)


Check out my Homemade Vanilla Pumpkin Spice Coffee recipe.

Homemade Salt Dough Ornaments

Baby Boy and I made some salt dough for the first time. I'm hoping that we can continue the crafts we've done as yearly traditions, because they're so much fun and are so personal.

I wanted to try colors so I cut the dough in half and added blue to one, leaving the other the normal dough color.

A crafter's battle scars


Here are some shapes I made to test the recipe.

I've never used salt dough before, so I wasn't prepared for the porous look after baking. Didn't really care for it.


For the actual batch I decided to coat my shapes with egg wash to give them what I hoped would be a rustic, antiqued look.

Toa's huge little hand


They came out darker than I wanted, and they puffed unevenly, but still looked kind of charming.
We ended up with 6 snowmen ornaments and Baby Boy's handprint ornament, which I've been meaning to make. Just need to write the year on the back and it will be a little keepsake to bring out year after year.


Casualties


Cook time: 40 min per batch at 400 degrees.


For now, you still have time to make some ornaments of your own! So here's the recipe that I found earlier this year and I wish I could remember where I got it from.

Salt Bread Dough

¼ Cup Salt

½ Cup Boiling Water

1 Cup All-Purpose Flour

¼ Teaspoon Vegetable Oil

Food Coloring (optional)
Pour boiling water in a bowl and add salt. Add remaining ingredients. Knead dough to desired consistency for crafting. If coloring dough with food coloring, work it uniformly into the dough as you knead the craft dough. Keep slat dough wrapped in plastic when not in use.

Model Dough as desired. It may be helpful to keep a bowl of water nearby while crafting to smooth dough and attach pieces.

Bake at 300 degrees for 45 to 60 minutes. Ornaments will puff a little when baked.

Completed ornaments may be painted, or brush with beaten egg and water mixture prior to baking or a darkened, shiny appearance.

A benefit of making Christmas ornaments with salt dough is that it can be colored with food coloring when it is made, and so does not have to be painted when it is finished. On the other hand, if you enjoy painting your Christmas ornaments, salt craft dough can be made plain and painted when it is dry. Salt dough is easy to work with and makes a lot of inexpensive Christmas decorations.

When crafting your Christmas ornament from salt craft dough, you may choose to cut the craft dough with cookie cutters or go for a more personal keepsake Christmas decoration. This salt dough recipe works well for baking handprint keepsakes; make handprint plaques, or with little hands, make a handprint Christmas ornament that can hang from the tree.

Now if only I could figure out where to put them. Baby Boy loves the way they look so I'd love to place them somewhere he can enjoy seeing them. Have fun decorating!

Sunday, December 5, 2010

Homemade Holiday Flavored Coffee


Rachel, one of my amazing, frugal mama friends has been making me drool every morning with her Facebook status, talking about different holidayish drinks she's starting her day with. Hot cider....pumpkin spice coffee... egg nog... Pure torture!

This morning, I was determined to try a homemade version using what we have in our cabinets. Why not just buy some gourmet coffee at the store? Um, have you read my blog? I like to find homemade.... hacks, if you will, to my dilemmas. I'm the girl who tried to create homemade allspice substitute just because!

So right now, Hubby and I are loving my latest experiment: Vanilla Pumpkin Spice Coffee. Mmmm! It's delicious and so easy. In case you, frugal diva that you are, wanted to try it for yourself, here's the recipe:

Homemade Vanilla Pumpkin Spice Coffee
-Coffee grounds, enough for a full pot
-1 tsp pumpkin spice
-1/2 tsp pure vanilla extract

Fill your coffee pot with water. 
Add filter filled with coffee grounds.
Add pumpkin spice and stir into coffee grounds
Drizzle vanilla extract into grounds. You can stir. I didn't and the flavor was still great.
Turn on coffee pot and brew. 
Serve with sugar and/or creamer to taste. Enjoy your cozy cuppa :)

I'm so excited that this worked! Think of all the spices you usually keep in the kitchen. The possibilities are endless, and oh so deliciously budget friendly.

I think Cinnamon Nutmeg Coffee is somewhere in our near future. If you try any fabulous new combos with your own kitchen spices, be sure to share your recipes!

Photobucket

Thursday, November 18, 2010

Sweet Potato Bread

So, after reading on another blog that they had a favorite recipe for pumpkin bread, I decided to make it and freeze it for Thanksgiving. One less thing I'd have to worry about, right? Well, in the middle of getting out all the ingredients this morning, I realized I didn't have any pumpkin puree. Well, great. But we were saved by the presence of a can of sweet potatoes in the cupboard! I followed the recipe along with some of the modifications in the comment section. I used the canned sweet potatoes that I pureed in the blender instead of pumpkin and just hoped for the best.

It smelled great and the loaves turned out beautifully. Here they are in all their freshly baked glory.

Hubby helped by getting me all the ingredients, greasing and flouring the pans.
What a sweetheart :) Ok, so I'm just lazy, but I love cooking together!

We'll probably fall like locusts on the first one, the second goes in the freezer for Thanksgiving, and the third will be given away to thank somebody for being awesome.

I really love that this recipe was so easy and makes three loaves. I'm definitely hoping to pick up some canned pumpkin and make more to freeze. It would be lovely to stock up on some yummy bready goodness we can have with coffee on cold mornings.

REVIEW: It tastes great! Very buttery and a nice blend of spices without being overpowering. Beautifully moist, bready / cakey texture with a sweet finish. My favorite part was a very thin little crystallized sugary crust that formed on top. I don't like coffee cakes and these types of fruit breads if they are too sweet or drowning in sugary glaze. This recipe will make a repeat appearance in my kitchen, whether it's made with pumpkin or not! 

Wednesday, November 17, 2010

Hummus, Sour Cream and Paneer

We had some raw milk about to go bad, and after a couple of quick internet searches I was able to find a few easy ways to make it last longer by making sour cream and paneer! Since I was in a creating mood today, I also decided to whip up some hummus to go with the fresh veggies Hubby picked up the other day. Yum. I love hummus.

You can see the recipe I used to make sour cream here, and the paneer recipe is here.
 Click here for a delicious (and simple) hummus recipe.

All these homemade goodies are good news for the celery sticks, bell peppers and cucumbers in my fridge! The sour cream can be used to create a homemade ranch sauce and  other nutritious dips for veggies, or served on the ever popular baked potato. It's also an ingredient in some of the tastiest coffee cakes.
Homemade sour cream :)

I think hummus is the perfect savory veggie dip or mayo substitute in sandwiches. And it's packed with iron too. It turned out lemony with a beautiful sesame flavor and just the right hint of garlic.


And of course I had to sample a little during lunch.
Clockwise from the top: One jalapeno pickle, fresh cucumbers for dipping,
hummus with a little olive oil and black pepper, spicy thai cucumber salad,
and some sweet gherkins. So GOOD!


I've never made paneer before but love it in Indian dishes. Now I can try making a vegetarian dish with paneer here at home. I'm so excited!
From over 1/2 gallon of milk, I got 1 cup of paneer and 4 cups of liquid.

I can't wait until we get more raw milk so I can try my hand at making a small amount of butter and then cream cheese after our next yogurt batch. Who knew milk could be so much fun?  I know it may seem like I play more with the milk than anything else, but we do actually drink tons of it too :).

Friday, August 20, 2010

Egg Recall


So, when you beautiful people are out picking up eggs to make a fabulous Egg White Toning Mask, be careful, there's an egg recall going on! Salmonella has been found on the eggshells of some popular egg brands. Here's an excerpt from an article I read:
The egg brands affected by the recall include: Lucerne, Albertson, Mountain Dairy, Ralph’s, Boomsma’s, Sunshine, Hillandale, Trafficanda, Farm Fresh, Shoreland, Lund, Dutch Farms, and Kemps.
Eggs are packed in 6- 12- or 18-egg cartons with Julian dates ranging from 136 to 225 and plant numbers 1026, 1413, and 1946.
Dates and codes can be found stamped on the end of the egg carton. The plant number begins with the letter P and then the number. The Julian date follows the plant number, for example: P-1946 223.
Consumers should not eat the eggs and should return recalled eggs to the store where they were purchased for a full refund.
Click here to read the full article.
So, be aware and be careful in the grocery aisles!
Happy (salmonella-free) Weekend, Beauties.

Sunday, August 8, 2010

Baby Wearing

After talking with a friend the other day I realized just how much baby wearing has become a part of my life. I thought I'd share.

Since Baby Boy was born, Hubby and I have been learning about attachment parenting and finding that it's definitely more our style. We're both comfortable with the idea of keeping our children close and secure with baby wearing.

The Samoan culture I grew up in was definitely pro attachment parenting, although without the convenience of wraps and slings. From infants to about 4 years in some cases, a child is held almost constantly and there are no negative affects that I saw or experienced. It actually seems to help young children feel safer and confident in themselves once they are too old to be carried. Almost everyone in Samoa practices attachment parenting and I was an attached child (if that's even a term) although I never knew the official terms. It is simply the way most Samoan children are raised. My sweet mom made a sling for me out of some spare fabric (hand sewn!) when Baby Boy was born, and little did I know that it would spark an active interest in me to apply attachment parenting.


Spring 2008.
Going to my very first check up after having Baby Boy. That's the sling my mom made! Isn't it lovely?


In the elevator at the doctor's office. I loved that sling, and constantly found ways to show off that I could get things done and still hold my baby.
Yes, yes, I'm strange. But you already knew that.


Winter 2009
Practicing how to wrap for an overseas trek. Baby Boy was a lap child and having him safely wrapped in front of me was such a huge relief during all the plane rides.


This is the wrong way to wear a wrap! Wearing it incorrectly had my back aching in less than 5 minutes and I had to take it off pronto. We didn't go anywhere, I was practicing (badly).

The striped wrap is a jersey/t-shirt like fabric I found on the WalMart clearance rack. I was so excited! I had been stalking keeping an eye on the fabric clearance for material with the right amount of give.


Summer 2010.
The photos below were taken just the other night as we headed out for a walk.
We like to take walks, especially in the evening. Baby Boy loves running around and I like that he has a healthy way to burn off the last of his energy before bed.

This day, though, Baby Boy had spent a hot day outdoors and had gotten slightly overheated. The entire afternoon I was giving him sippy cup after sippy cup of fluids to rehydrate my sluggish boy. When it was time for our walk, I hesitated, thinking, what's the point of letting him sweat out all the water that had just been replaced in his system?


I was about to cancel our walk when Baby Boy tiredly tugged me over to the linen closet where his wrap is kept. I was surprised he remembered it. We hadn't used the wrap for a while. 
What a smart little guy, I thought. Now we didn't have to give up our walk, and I didn't have to lug both him and the stroller up and down the stairs. 

Photos were a last minute decision so forgive the angles. Click on images for a larger view.

Same wrap that we took on our overseas trip.
This tibetan carry is my favorite at the moment. Baby Boy is nearly 40 pounds and this particular style of wrapping the fabric evenly distributes his weight and supports both his back and mine, so there is no strain, even while taking the stairs. He was quite comfortable, waving and chatting to everyone we passed, while taking swigs of his juice.

I'm working on teaching myself to sew and hopefully will be confident enough to make myself a fabric carrier when we have another child. I'd love to try them all!

Where to find information:
There are so many wonderful sources out there for homemade wraps/carriers! Etsy.com is full of people selling them, as is blogger. Thebabywearer.com is also a great resource for someone curious about free patterns to make their own carrier. I know I'll be using a lot of suggestions from there to form my own machine sewn wrap. Wrapyourbaby.com and youtube.com have been a huge help for me with their free videos and photo tutorials on tying different carries. I recently stumbled on Cuddle Wraps and am in the process of ordering one for my sister (I'm going to be an aunt again! Yay!) through amazingly helpful Christina who makes them. I just love the fact that attachment parenting is 'catching on', not just because it makes it easier to buy well made wraps and such, but also because I think attached kiddos are so happy! Not that other children aren't, but I love seeing the security children express when raised the attached way. There I go, making up my own terms again, but by now you understand what I'm saying. Hubby and I love it! And are excited to continue raising our family this way for many more beautiful years to come.

I joke about being a baby wearing grandparent someday, but I'm totally serious. If my grown children don't mind my toting my grandkids around in a baby wrap on my day to babysit, I will rock that fabric swathed around me! If it doesn't suit my children's style, I won't sweat it, just pull out the stroller and off we go to spend some grandparent/grandchild quality time. The thing is, it's just a preference. Other people may prefer not to participate in attachment parenting, but it doesn't mean either preference is wrong. As long as children are happy and well cared for, that's all that matters.

What things have you learned about raising your family that you've unexpectedly come to love?

Note: I don't receive any type of compensation from the above mentioned sites. I'm simply sharing the resources I've found personally helpful. Enjoy!

Thursday, August 5, 2010

Taco Beef and Rice


Technically, it's Leftover Night and I'm not supposed to cook, but I (technically) took last night off from cooking. So, because Hubby was a good sport and made his own dinner after a long day of work, I'm whipping up a quick and easy meal of ground beef and rice. Well, hey, I figured he was basically thrown for a loop since he can expect to cook for himself on Thursdays and not Wednesdays, but he handled it manfully. I can make brown gravy, but wanted to do something a little different. I saw that Homemade Mamas posted this recipe for homemade taco seasoning and thought Yes! That's dinner! Hubby loves Mexican food so this is especially for my wonderful man! I'm so interested in homemade spice mixes after my recent foray with an allspice substitute.
What are you having for dinner?

Wednesday, August 4, 2010

Homemade Swiffer Wet Jet Refill

I recently used the last of my wet jet solution and was sadly contemplating the retirement of my swiffer to storage because I couldn't afford the refills. That same day, I found out about homemade baby wipes and after making my own, I thought, why don't I make my own swiffer refill?

There was only one difficulty (getting the cap off) but otherwise, it's a breeze!

Here's what I used:
Empty Swiffer cleaning solution bottle
1 cup of hot water
Vinegar and water mix


After struggling to get the cap off and ending up frustrated, an idea struck! Well, it's back to basic science then. I boiled a few cups of water and put the wet jet bottle in upside down for a couple of minutes to let the plastic expand.

Two minutes later, the cap twisted off easily! You have no idea how pleased I was. I was literally smiling for the rest of the day because this worked :)

I was in such a rush, though, that I forgot to take a photo of the cap off of the bottle. Oh well.

Next, I filled it with vinegar and water and replaced the cap.


Popped it back into the swiffer sweeper thingy....


Presto! Ready for action. Aaahhhh.... saving money is sweet bliss.
For the moment, I'm good on the swiffer pads, but when those run out, there's no way I'm buying more. I'm already planning to make washable pads out of old towels or something. But, we'll handle that when the time comes. For now, I'm so glad I still get to use my swiffer!

I'm linking to:

Monday, August 2, 2010

Homemade Baby Wipes

Homemade Mamas posted a recipe for homemade baby wipes. Uh huh. Homemade. Baby Wipes! Brilliant!
I found it at a particularly fortuitous time. I was about to run out of baby wipes and was thinking, there's just got to be a better way. Then as I was posting my entry to last week's HodgePodge Friday party: Voila! One of the fabulous projects was this little gem of information. As soon as I read about it, I called Hubby and asked him to pick up some paper towels. The brand I wanted couldn't be found smaller than a nine pack, so yeah. We're good on wipes for a long time!

If that recipe isn't your style here are a few more that may suit you and your baby. Girl in Air also has a tutorial that is amazingly easy and had a couple great tips I wish I'd read before making my first homemade baby wipes. 

I had fun making them and loved knowing I was saving money in a new way that will really make a difference for us! Here's my first attempt:

Cut a roll of paper towels in half.
Tip 1: DO NOT use a serrated knife unless you're in the mood to clean up a mess.
Tip 2: Leave the cardboard tube in the middle unless you're in the mood to clean up a mess. It's much easier to pull out once the paper towels soak up the liquid.  


Gather your materials. I used olive oil, unscented body wash, and lavender oil (for the lovely smell and cleansing properties).


I poured my boiled, cooled water into an empty wipes tub then added a few squirts of body wash, a few squirts of olive oil and 2 drops of lavender oil. 
Mixed them all up. I love using chopsticks instead of a whisk for mixing.
Hey, I still whisk, but when the whisk is in the sink, the chopsticks get to party.


I placed one half of the paper towel roll in the mix and turned it over a few times to let it soak up on every side.
TIP 3: When it's soaked up all the liquid, the tube in the center can be removed easily. 


Since the container isn't air tight, I put a sheet of plastic wrap on top before closing. 
 TIP 4:
Using a tall container where your wipes stand on end is more convenient than one where they lay on their side. It really makes it easier to pull out one wipe at a time.

I thought I could make it work, but the paper towels tore even with careful handling as I turned the wet roll over to remove a single wipe. I'll be on the lookout for a taller container. 

Minutes after I finished making these, my son needed a diaper change. Is it sad to admit I was excited to use my new wipes?
I'm so happy with them, other than the container. They clean just as well as store bought wipes and they smell wonderful! Next time, I'll lessen the amount of water and add more olive oil. One of these days I'll find the right combo for us.

I love saving money! It might be a bit of an obsession, but hey, I make my own amusement around here. Have you discovered a new way to save money lately?

Start Swagging!

Recommended reading and other products...