----------------------------------------
Tutorial Tuesday: Homemade Spackle 7/20/2010
Here's a favorite household tip I gleaned from my Grandpa Roy. One of the many tricks a military family learns having to constantly move from place to place :). This recipe was a life saver when we moved into our first dinky dingy apartment and the entire place was covered with holes from previous tenants. It seems to work best on small nail holes (no matter how many) and thin wall cracks. Of course it won't restore the integrity of the wall (when you find that super spackle that does, call me! ), but it will at least look nicer.
Homemade Spackle2 Tbs salt2 Tbs cornstarch or flour4-5 tsp water
-STEP 1: In a small container, combine ingredients to make a thick, pliable paste. 
Some people like to add paint at this point, to match whatever wall they're patching. My experience has taught me that painting after is more reliable. For some reason, the pre-colored paste looks slightly off when it dries, in which case you'll just repaint it anyway.
So save the headache, unless you're totally awesome and it turns out for you. In which case, I'd be jealous, but I digress...
-STEP 2: Fill hole and let dry. I just pat it on with a finger.

Still wet, just after application. Fortunately, the apartment walls are textured to hide the abuse of many tenants, so the lumpy-ness works.
-STEP 3: If necessary, smooth with fine grade sand paper. Surface can now be painted to match the rest of the wall.
Oddly, my lumpy paste matched the wall's texture and color, so I didn't need to do any finishing. Very nice! 
Oh my, a way to upgrade the look of your holey walls and save money? I think I shall swoon! After I hang some shelves.... which you got a peek of in the photo above. Shelves to be revealed later :)
Happy spackling!
----------------------------------------
Tutorial Tuesday: How to Replace a Light Switch Plate
It seems the previous owner used a sprayer to paint all the rooms, including the light switches and outlets. Not a great look. To top it off, it is flat paint so it absorbed every smudge and print left by frequent use.
This was my very first time changing out switch plates, so I figured I'd document it.
STEP 1: Use a box cutter to cut through the paint attaching the plate to the wall. Do not cut into the drywall! Notice the angle of the blade. All that was needed was to separate the plate from the wall.
STEP 2: Using a screwdriver, remove the tiny screws and then lift off the plate.
STEP 3: Install the new plate with new screws, making sure it's straight. These took less than 2 minutes each. I can imagine how quickly it would go replacing plates that aren't fused to the wall with paint. 
Repeat on outlet covers.
 You can see the switches and actual outlets are still caked with paint, but it looks a whole lot better. I was excited to do this little makeover! During my cleaning, I came across a bunch of these plates Hubby collected while he was working construction. I think it makes a big difference! Not perfect, but much better. Only a few more plates to go before I'm done with this little project.
I found remnants of a pretty (but dated) wallpaper under the kitchen light switch plates. I'm curious now what this place looked like originally.... it has me daydreaming about the people who may have lived here.
-----------------------------------------
Tutorial Tuesday: Kefir Smoothie 6/14/2010
I've been drinking 8 oz of kefir every day as a part of introducing fermented foods to my diet. Read more on that in this post. Most days I drink it straight (think drinkable yogurt with more of a tang), but on mornings when I have a few extra minutes I'll make it into kefir fruit smoothie. What a tasty way to take your medicine!
Measure roughly 8 oz of kefir

In a blender, toss a serving of fruit (your preference) and pour in 1 oz of kefir.

Add a scoop of supplement powder (whey, protein, fiber, etc) and blend until doubled in volume.
 In a tall glass, pour blended fruit mix into the rest of kefir & stir to mix well. Here it is before stirring.
I always share mine with Baby Boy, so here are our two smoothies, complete with straws. Little Man loves that he gets a straw. I think that may be half the reason he loves kefir smoothies, for the cool straw.

He will not come up for air until it's all gone. I don't blame him. They are so good!

I wanted to show the rivulets left on the cup I used to measure the kefir. From what I've read, that's an indication that the bacteria is healthy and active. Yay!

I did want to explain why you don't dump the entire serving of kefir into the blender and why you can't get your daily intake by stirring it into coffee to make it more palatable. Kefir is a living bacteria, so extreme temperatures will kill it (hot coffee) and blending it all will cause stress to the probiotic organisms and you won't get the full benefit of drinking carefully cultured, live kefir. You just want to pour enough to moisten your other ingredients and blend them all together without having to add another liquid and dilute your kefir smoothie. I know all this live bacteria talk is gross to some, but it really does make sense. Yogurt is basically the same thing, a fermented food full of 'good' bacteria to balance & flush your system of the 'bad'. Except kefir is naturally rampant with strong quantities of healthy yeast and bacteria, as is kombucha tea, speaking of which: my tea is ready! Brewing station photos available in this post. I'll do a separate post on that sometime this week. Later then.
----------------------------------------
Tutorial Tuesday: Homemade Spackle 7/20/2010
Here's a favorite household tip I gleaned from my Grandpa Roy. One of the many tricks a military family learns having to constantly move from place to place :). This recipe was a life saver when we moved into our first dinky dingy apartment and the entire place was covered with holes from previous tenants. It seems to work best on small nail holes (no matter how many) and thin wall cracks. Of course it won't restore the integrity of the wall (when you find that super spackle that does, call me! ), but it will at least look nicer.
Homemade Spackle2 Tbs salt2 Tbs cornstarch or flour4-5 tsp water
-STEP 1: In a small container, combine ingredients to make a thick, pliable paste.
Some people like to add paint at this point, to match whatever wall they're patching. My experience has taught me that painting after is more reliable. For some reason, the pre-colored paste looks slightly off when it dries, in which case you'll just repaint it anyway.
So save the headache, unless you're totally awesome and it turns out for you. In which case, I'd be jealous, but I digress...
-STEP 2: Fill hole and let dry. I just pat it on with a finger.
Still wet, just after application. Fortunately, the apartment walls are textured to hide the abuse of many tenants, so the lumpy-ness works.
-STEP 3: If necessary, smooth with fine grade sand paper. Surface can now be painted to match the rest of the wall.
Oddly, my lumpy paste matched the wall's texture and color, so I didn't need to do any finishing. Very nice!
Oh my, a way to upgrade the look of your holey walls and save money? I think I shall swoon! After I hang some shelves.... which you got a peek of in the photo above. Shelves to be revealed later :)
Happy spackling!
Here's a favorite household tip I gleaned from my Grandpa Roy. One of the many tricks a military family learns having to constantly move from place to place :). This recipe was a life saver when we moved into our first dinky dingy apartment and the entire place was covered with holes from previous tenants. It seems to work best on small nail holes (no matter how many) and thin wall cracks. Of course it won't restore the integrity of the wall (when you find that super spackle that does, call me! ), but it will at least look nicer.
Homemade Spackle
2 Tbs salt
2 Tbs cornstarch or flour
4-5 tsp water
-STEP 1: In a small container, combine ingredients to make a thick, pliable paste.

Some people like to add paint at this point, to match whatever wall they're patching. My experience has taught me that painting after is more reliable. For some reason, the pre-colored paste looks slightly off when it dries, in which case you'll just repaint it anyway.
So save the headache, unless you're totally awesome and it turns out for you. In which case, I'd be jealous, but I digress...

-STEP 2: Fill hole and let dry.
I just pat it on with a finger.

Still wet, just after application. Fortunately, the apartment walls are textured to hide the abuse of many tenants, so the lumpy-ness works.

-STEP 3: If necessary, smooth with fine grade sand paper. Surface can now be painted to match the rest of the wall.
Oddly, my lumpy paste matched the wall's texture and color, so I didn't need to do any finishing. Very nice!

Oh my, a way to upgrade the look of your holey walls and save money? I think I shall swoon! After I hang some shelves.... which you got a peek of in the photo above. Shelves to be revealed later :)
Happy spackling!
----------------------------------------
Tutorial Tuesday: How to Replace a Light Switch Plate
It seems the previous owner used a sprayer to paint all the rooms, including the light switches and outlets. Not a great look. To top it off, it is flat paint so it absorbed every smudge and print left by frequent use.
This was my very first time changing out switch plates, so I figured I'd document it.
STEP 1: Use a box cutter to cut through the paint attaching the plate to the wall. Do not cut into the drywall! Notice the angle of the blade. All that was needed was to separate the plate from the wall.

STEP 2: Using a screwdriver, remove the tiny screws and then lift off the plate.

STEP 3: Install the new plate with new screws, making sure it's straight.
These took less than 2 minutes each. I can imagine how quickly it would go replacing plates that aren't fused to the wall with paint.

Repeat on outlet covers.


You can see the switches and actual outlets are still caked with paint, but it looks a whole lot better. I was excited to do this little makeover! During my cleaning, I came across a bunch of these plates Hubby collected while he was working construction. I think it makes a big difference! Not perfect, but much better. Only a few more plates to go before I'm done with this little project.
I found remnants of a pretty (but dated) wallpaper under the kitchen light switch plates. I'm curious now what this place looked like originally.... it has me daydreaming about the people who may have lived here.

Measure roughly 8 oz of kefir

In a blender, toss a serving of fruit (your preference) and pour in 1 oz of kefir.

Add a scoop of supplement powder (whey, protein, fiber, etc) and blend until doubled in volume.
 In a tall glass, pour blended fruit mix into the rest of kefir & stir to mix well. Here it is before stirring.
I always share mine with Baby Boy, so here are our two smoothies, complete with straws. Little Man loves that he gets a straw. I think that may be half the reason he loves kefir smoothies, for the cool straw.

He will not come up for air until it's all gone. I don't blame him. They are so good!

I wanted to show the rivulets left on the cup I used to measure the kefir. From what I've read, that's an indication that the bacteria is healthy and active. Yay!

I did want to explain why you don't dump the entire serving of kefir into the blender and why you can't get your daily intake by stirring it into coffee to make it more palatable. Kefir is a living bacteria, so extreme temperatures will kill it (hot coffee) and blending it all will cause stress to the probiotic organisms and you won't get the full benefit of drinking carefully cultured, live kefir. You just want to pour enough to moisten your other ingredients and blend them all together without having to add another liquid and dilute your kefir smoothie. I know all this live bacteria talk is gross to some, but it really does make sense. Yogurt is basically the same thing, a fermented food full of 'good' bacteria to balance & flush your system of the 'bad'. Except kefir is naturally rampant with strong quantities of healthy yeast and bacteria, as is kombucha tea, speaking of which: my tea is ready! Brewing station photos available in this post. I'll do a separate post on that sometime this week. Later then.
------------------------------------------------------------------------------
Cove Cleaning Recap Days 1 and 2 (Tutorial Tuesday: How to Stay Busy 6/8/2010)
I realize you may not be interested in my cleaning/painting the entire house, but in preparation for viewings and such, it's taking up my entire time. So, without this, there would be no blogging. And I'd like to have a record of it all so I can see progress and not give up! I've written before how cleaning is something I'm still learning, so bear with my Yay Me posts for the next 3 weeks. It's quite an endeavor for me! So here's how to stay busy:
Sunday:
Arrive in the evening and immediately wear yourself out by sweeping the master bedroom and hallway carpet, whisking away all the dirt and fuzzies left behind from the move. Be thankful for your sweet little brother who, after driving 5 hours to get you all home, declutters the room and hall while you sweep.
Eat the hot pisupo your bro fixed (yum!) and then go shopping for cleaning supplies. Get home just in time for Baby Boy's bedtime.
Go against your better judgment and scrub and declutter the countertops. Do a load of dishes in the dishwasher. Then stay up until almost 2AM, your mind racing with how much there is to do. Finally blow up your airbed and collapse in a wakeful sleep until Baby Boy (who was bad and climbed out of his crib) comes to find you in the morning.
Monday:
Find a bathroom that was left messy and then not used for almost 2 months. Fellow swiffer fanatics, you may wish to avert your eyes.
Eek! Totally my fault because we were in such a rush. Gross.


Clean it.

Oooohhhh....

Aaaahhhhh....

Any tips on how to get that caulk on the bottom of the shower squeaky clean? Scrubbing is so not working. I'll be re-caulking it, but want to make sure the black stuff is good and dead before I do that.

Stop to feed your always-hungry-but-being-so-good-and-playing-while-mama-cleans boy. Complete with makeshift table a la Uncle Resa. Toa loved his turkey 'manitch'.

Get interested in fermented foods and research like crazy in your downtime. Order a kombucha tea scoby and kefir grains to start growing bacteria for fermented foods. I admit, there's an ulterior motive. I've read numerous accounts of fermented foods ridding the body of toxins and adding beneficial probiotics to your diet. Ridding toxins. As in people have eradicated crazy allergies that came out of nowhere using fermented foods. Yes, poor selfish me, I'd like to eat shrimp and nuts again someday without them killing me :)
Kefir grains

Kombucha scoby. Yay! Two varieties of my very own bacteria!!

When they arrive, get a strange thrill (akin to a kid playing with a chemistry set for the first time) when you set them aside to ferment and multiply.
Kefir grains working to make ordinary milk into a probiotic allergy fighting machine.

Kombucha tea fermenting on the counter. One week to fizzy, allergy fighting, metabolism boosting tea.

Stop playing with the bacteria to feed your good boy again. Isn't he a sweetie? He showed me a new skill: eating with no hands. Yes, my poor son had a sandwich for breakfast and lunch. Hey, it was easy.

On to the stove. Whoa. I had no idea I left it so bad. My poor stove! It has served me well. My poor bro could've had a grease fire on his hands and been all alone. Ack. I felt horrible thinking that. And for the record, I had no idea those burner thingies could be removed and cleaned. Duh. Anyway, I know now.

*Trumpets* Tada!!! Amazing what vinegar and hot water can do. No more icky grease. No more trippy white stuff hanging from the inside of the lid. See what I mean? The burner thingies are gone. They're getting a good soak. In clorox. Ha!

Make teriyaki cabbage chicken stir fry in an electric skillet because the stove is (obviously) still at the spa.

Feed your boy dinner, wipe down the counters and put up your feet. It's been a long day.
Tuesday:
Today I'm scrubbing the kitchen cabinets, stove and the baseboards in the master bedroom and bath. Oh yeah, and every time I pass the guest bathroom, I scrub a little at a time of the bath tub/ shower walls. Is there such a thing as a vinegar headache? Because I think I have one. I know this is a rambling tutorial and it doesn't really teach how to do anything, but oh well. It's what's going on right now. More photos tomorrow (oh lucky you) if I can figure out why my camera refuses to read my SD card after I loaded up the last of these photos. Happy Tuesday, folks!
---------------------------------------------------------------------------------
Tutorial Tuesday: Colcannon Recipe 6/01/2010
Delicious, comfort food is on today's tutorial menu. Colcannon is a tasty, easy and inexpensive Irish dish that we have just discovered and now love! I used this recipe for the tutorial. Hope you get to try it sometime, it's so much better than mashed potatoes. This dish is definitely a keeper:
Steam potatoes that have been quartered. Don't forget to keep the skin on. Steam until tender.

Chop your cabbage. And boil in water until the color darkens.

When cabbage is darkened, turn off heat, add a knob of butter and cover. This step really makes the cabbage tender and delicious. Baby Boy loved it just like that.

Drain. Do not rinse.

Chop green onions.

Meanwhile, boil your meat in your choice of flavored or plain water. This can be ham, roast, or whatever you have. We've had it with ham, but for the tutorial, I had a small roast on hand so that's what went into the pot. Boil until tender and then shred and set aside.

Put milk and green onions in a saucepan with whatever seasoning you want. I like adding black pepper. Bring to a boil.

Peel and mash potatoes in a large skillet or bowl.

Add butter and mix well.

Stir in seasoned milk, cabbage and meat.

Serve with a pat of butter and enjoy!

As part of his learning how to cook, Baby Boy got to taste each ingredient by itself so he can recognize it all someday. I'm hoping anyway. For now, he thinks it's just awesome that he got to eat before everyone else!
A little cabbage, some roast and a bit of potato. Yum.

Happy Tuesday, folks!
----------------------------------------
Tutorial Tuesday: Honey Lemon Bars 5/18/2010
I used this recipe to make this supposedly healthier version of lemon bars. Didn't really turn out the way I thought it would, and I don't think I'll be making this again, but hey, a tutorial it is and so you get photos : ).
Honey Lemon Bars
Cream butter and honey.

Add egg, lemon zest, lemon juice, and ricotta cheese. Mix well.
I used yogurt that had been hanging for 2 hours in place of ricotta cheese as an experiment. The whole thing's gross looking, I know! And I accidentally added the baking powder in this step when it wasn't supposed to be added until the last step. Oops :)

Add flour and baking powder. Mix lightly, until just combined.

Pour into greased baking pan and bake for 25-30 minutes at 375 degrees F. Tada! Enjoy your slightly lemon flavored non cake but not bread either thingy.


---------------------------------------
Tutorial Tuesday: How to Earn a Cookie
First, rearrange Mama's cabinets.

Then, put everything back (better than it was before!) except for one special bag of beans. Explain to Mama how special it is.

Fall down a huge mountain.... and tell everyone how you survived.

Help Mama make butternut squash stew and sing "Stir, stir, stir the food!"

Take a break with Mama.

Pick up your toys.

Tada! Claim your cookie wafer thingy!

Hope you enjoyed Baby Boy's tutorial :) He's been a very busy little man.
So....my attempt at honey roasted squash seeds didn't work out. They're like crunchy almost squash seed tasting carbon. Not my original intention.

Have a wonderful night, all! Now go earn those cookies ; )
--------------------------------------
Tutorial Tuesday: Homemade Yogurt
I used this tutorial to make my very first batch of crock pot yogurt. Thanks, to my sis in law, for finding this! I think we'll be making this regularly since we like it in smoothies and Indian cooking. I had a large container of plain natural yogurt for my face masks, so I happened to have all the materials on hand.
From everything I've read, you need to make yogurt with your saved starters every week or the cultures will get sour and turn the next batch sour. So I'm reserving 2 cups from this batch (broken up in 1/2 cup amounts) and freezing them so I don't have to stick to the 1 week time frame and not worry about the starter getting too tart. It's an experiment that might bomb :)
When it first came out of the crock pot, the yogurt wasn't very thick. And after putting it in the fridge for several hours it thickened up a little, but not much. Even after a few days, it didn't get thicker than that. Runny yogurt isn't very appetizing to us, so I hung the yogurt, a step I borrowed from some Indian recipes I've read.
See? Here it is, hanging on the sink in my makeshift yogurt hanging bag. I cut a clean pillow case in half and ladled the yogurt into it, tied it at the top and then used a fabric napkin to tie it to the sink. Oh yeah, classy is the only way to go.
 After hanging 3 hours. You can see the difference in volume from the picture above. All that water drained out.

I've read that you can hang it for 1 hour, but mine was still really watery, so it ended up hanging for 3 and then, as it's fabulous new creamy self, it was ready to go back in the fridge to await some hungry snacker.

So thick and creamy. Some people may be concerned about the taste of crockpot yogurt. It tastes great! Like normal plain yogurt you buy in the store, just with a more watery texture. I added vanilla extract to the finished batch and serve it with fresh fruit and/or honey. The diluted texture was an issue for me, but now that I know we can hang it, that problem's solved :) Just be sure to set aside your next batch's starter before you sweeten or vanillarize it all.

The downside of hanging yogurt is that you end up with way less yogurt. I started with almost half a gallon and after hanging, collected about a pint. But this newly thickened yogurt is delicious served the normal way or can be used as a marinade, meat tenderizer, or low fat thickener for curries or gravy. For marinades, stir your spices into the yogurt and coat meat or veggies with the mixture. Set in fridge at least 1 hour (or overnight) and cook as usual.
 I think, to make it worth it, I'll hang it for less time so we'll end up with more that will last longer. I really love the thick smooth texture from the 3 hour hanging though. Ah well.

like to make my own facial products when I can. Every Thursday, which I have claimed for my personal Spa Night, I use different homemade products depending on what I want to do that particular evening. Some Thursdays, I sprinkle homemade moisturizing bath salts into my foot soak, followed by a homemade foot scrub before I treat myself to a pedicure. I almost always do a homemade face scrub and mask on Thursdays, and like to do a deep conditioning oil treatment on my hair twice a month, but I'll save those recipes for a later post. Since the move, I haven't really made the time for my Spa Night and I can see the negative effects in my skin and hair. Today, I wanted to post one of my favorite homemade toner recipes. There are a lot of recipes out there but I like to use a tried and true mixture that works amazingly well for my crazy combination skin.
This is a recipe for a liquid toner that is meant for daily use. I just made a batch (my first in a long time) and it feels amazing on my stressed, broken out skin. Once my skin clears, I know this toner will help to keep it that way.
My toner made with this recipe. Fresh out of the fridge, shaken up and ready to apply.

I'll be sharing more of my homemade spa recipes in the future. Hope you get to try this! It's economical, all natural and doesn't have any harsh chemicals in it. I'm not an expert, but I have been using my own products for a long time and have loved the results. If you have any questions for recipes for different types of skin or a particular beauty problem, ask me and I'll do my best to find the right combination of ingredients for you. Happy Tuesday, people!
From everything I've read, you need to make yogurt with your saved starters every week or the cultures will get sour and turn the next batch sour. So I'm reserving 2 cups from this batch (broken up in 1/2 cup amounts) and freezing them so I don't have to stick to the 1 week time frame and not worry about the starter getting too tart. It's an experiment that might bomb :)
When it first came out of the crock pot, the yogurt wasn't very thick. And after putting it in the fridge for several hours it thickened up a little, but not much. Even after a few days, it didn't get thicker than that. Runny yogurt isn't very appetizing to us, so I hung the yogurt, a step I borrowed from some Indian recipes I've read.
See? Here it is, hanging on the sink in my makeshift yogurt hanging bag. I cut a clean pillow case in half and ladled the yogurt into it, tied it at the top and then used a fabric napkin to tie it to the sink. Oh yeah, classy is the only way to go.


I've read that you can hang it for 1 hour, but mine was still really watery, so it ended up hanging for 3 and then, as it's fabulous new creamy self, it was ready to go back in the fridge to await some hungry snacker.

So thick and creamy. Some people may be concerned about the taste of crockpot yogurt. It tastes great! Like normal plain yogurt you buy in the store, just with a more watery texture. I added vanilla extract to the finished batch and serve it with fresh fruit and/or honey. The diluted texture was an issue for me, but now that I know we can hang it, that problem's solved :) Just be sure to set aside your next batch's starter before you sweeten or vanillarize it all.

The downside of hanging yogurt is that you end up with way less yogurt. I started with almost half a gallon and after hanging, collected about a pint. But this newly thickened yogurt is delicious served the normal way or can be used as a marinade, meat tenderizer, or low fat thickener for curries or gravy. For marinades, stir your spices into the yogurt and coat meat or veggies with the mixture. Set in fridge at least 1 hour (or overnight) and cook as usual.

And here are my saved starters in the freezer. We'll see if they still work once yogurt making time comes around again.

------------------------------------------------
Tutorial Tuesday: Homemade Coffee Creamer 4/27/10
Had this post ready when we still had a car, so even though I missed Tutorial Tuesday, I figured I'd post it anyway.
We use a lot of creamer around here and since finding out that powdered creamer is flammable, we've switched to liquid. Thanks to my brother, who made me aware of that fact, I'm now contemplating how much coffee flavored lighter fluid I've ingested. *gag* . Haha! The trouble is, the liquid stuff doesn't last as long for us and it's way more expensive, so I decided to try making some.
Vanilla Dream Liquid Coffee Creamer. Ha! Figured I would try to make it sound posh.
2 cans evaporated milk
2 cups milk
2 Tbs vanilla extract
3 Tbs sugar
Directions
In a large bowl, whisk all ingredients until well combined and sugar is dissolved.

Pour into a measuring cup to make it easier to transfer to your creamer bottle. Store in the fridge in a covered container (I just used an empty half gallon milk jug). Shake well before each use.
It tastes pretty good!

This recipe gave us 4 cups of creamy vanilla goodness for our coffee.
I made another batch about a week later:
Mocha Mambo Liquid Creamer. Because it Mambos with the coffee already in your cup. Oh yeah, it's a coffee party ;)
1 can evaporated milk
1 can condensed milk
1 cup regular milk
2 tsp instant coffee
Mix all ingredients until well encorporated. Place in your container of choice and store in the fridge! That's it.
This made just over 3 cups of mocha creamer :)

Yes, I'm crazy. I made coffee flavored coffee creamer. But you know what? It tastes awesome! I think I'll use condensed milk every time now since it allows me to save sugar for other cooking. Plus, it made the new batch a little thicker like 'real' creamer. I'm going to have so much fun making different flavors!
I'm guessing it's only good as long as the regular milk is fresh. We just bought the milk and the expiration date is in less than two weeks, so that's when we'll check if it starts to smell snarky.
--------------------------------------
Tutorial Tuesday: Homemade Hot Oil Treatment & Vinegar Shine Rinse
More spa goodies out of your kitchen cabinets! I decided to post this because of a request for it, and also, my hair is in sore need of a treatment. So here are my absolute favorite treatments for dull, dry scalp and hair. There are fancier recipes around, but I love these because they work for me and the ingredients are relatively cheap. Gotta love a great deal on feeling pampered!

Pour extra virgin olive oil into a saucepan. Add dried rosemary, stirring in slowly. Place the pan on the stove and heat over medium heat until the oil is warm. I set a timer for 2 minutes and then remove it from heat. You want the oil very warm, not scalding hot.

Strain through a paper towel to remove rosemary.

Coat hair from the scalp to the ends with mixture. For oily hair, use more on the shaft and ends and a small amount near the scalp. For extremely dry hair, saturate everything including scalp. For either hair type, pay special attention to hair ends.
Twist hair upon itself on top of your head and wrap in plastic wrap or shower cap.

Heat up a damp towel in the microwave until very warm (about 2 minutes). Towel should be steamy but not scalding hot. Wrap the hot towel around your head and let the oil treatment do it's magic for 20 minutes.

Remove the towel. Remove and discard plastic wrap. Wash your hair twice with a mild shampoo (when I say mild, I mean no Head & Shoulders) to remove all of the oil. Rinse the first shampooing out with very warm, almost hot water. Rinse the second shampoo with slightly warm, almost cool water. Going immediately from hot to cold water always gives me a huge brain freeze type headache so I don't do it.
For your final step, saturate hair with the vinegar rinse mentioned earlier. Let sit for 1 minute. Any longer and it might have a drying effect. Rinse with cool water until vinegar smell is gone. Cold water seals the hair shaft and locks in shine.
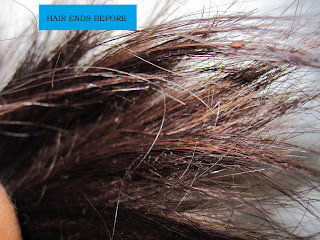
Before. Dried out and frizzy.
 After. The lighting's not so great, but you can immediately see that the hair is moisturized and there's zero frizz. If you could see it in person, you'd notice there's a HUGE change in deeper color and lots of shine. Try it and see!

Happier endings :) Still need trimming, but they're not dried out anymore.

You'll love your shiny, soft, dandruff free hair! If you try these recipes, I'd love to know how they work for you. Now that you have the recipes you can head to the store and grab whatever ingredients you don't have on hand in time for your next Spa Night. Enjoy!
Disclaimer: All homemade beauty products and results are based on my own use and experience. The facts included about these cupboard products are only a few benefits, there are many more amazing things they can add to at home skin/hair care. These are simply the reasons I started using them in the first place. Use responsibly. I cannot be held responsible for any allergic or adverse reactions experienced while using recommended ingredients.
Vinegar Shine Rinse
This needs to be prepared either ahead of time or while you let the oil treatment set because you'll need it for the last step of this treatment.
Ingredients
1 cup water
1 Tbs apple cider or white vinegar
Pour both ingredients into an empty bottle and shake to combine. Set aside for later. This is the rinse recipe doubled so I have extra for later in the week.

FUN FACTS
-Vinegar closes hair's cuticles (keeping it from absorbing excess dirt) and removes scaly buildup leaving hair smooth and shiny. It also promotes circulation in the small capillaries essential to healthy hair growth.
-The vinegar rinse can be kept in your shower and is safe to use once or twice a week after your normal shampoo for shiny, residue free hair. Over time it helps control dandruff as well.
Hot Olive Oil Deep Conditioning TreatmentDO NOT ADD ROSEMARY IF PREGNANT OR NURSING. Large quantities of this herb could cause vomiting, nausea, and muscle spasms in women who are pregnant or breastfeeding. The hot oil and vinegar rinse will provide more than enough conditioning and shine for hair.
Ingredients
1/2 cups of extra virgin olive oil
1 Tbs dried rosemary
Pour extra virgin olive oil into a saucepan. Add dried rosemary, stirring in slowly. Place the pan on the stove and heat over medium heat until the oil is warm. I set a timer for 2 minutes and then remove it from heat. You want the oil very warm, not scalding hot.

Strain through a paper towel to remove rosemary.

Coat hair from the scalp to the ends with mixture. For oily hair, use more on the shaft and ends and a small amount near the scalp. For extremely dry hair, saturate everything including scalp. For either hair type, pay special attention to hair ends.
Twist hair upon itself on top of your head and wrap in plastic wrap or shower cap.

Heat up a damp towel in the microwave until very warm (about 2 minutes). Towel should be steamy but not scalding hot. Wrap the hot towel around your head and let the oil treatment do it's magic for 20 minutes.

Remove the towel. Remove and discard plastic wrap. Wash your hair twice with a mild shampoo (when I say mild, I mean no Head & Shoulders) to remove all of the oil. Rinse the first shampooing out with very warm, almost hot water. Rinse the second shampoo with slightly warm, almost cool water. Going immediately from hot to cold water always gives me a huge brain freeze type headache so I don't do it.
For your final step, saturate hair with the vinegar rinse mentioned earlier. Let sit for 1 minute. Any longer and it might have a drying effect. Rinse with cool water until vinegar smell is gone. Cold water seals the hair shaft and locks in shine.
FUN FACTS
-Olive oil is an amazing natural moisturizer. It also works great as an all over body moisturizer on damp skin fresh out of the bath.
-Rosemary has been used throughout history in home therapy to deepen natural hair color.
-If it's the first time in a long time that you've done a deep conditioner, you may want to do the treatment once a week until you get your hair where you want it. Then you can deep condition only when you need it. Most people only need it once or twice a month.Can you see the difference? I can! My hair doesn't look like it was abandoned in the desert anymore. It even feels better.
Before. Dried out and frizzy.


Happier endings :) Still need trimming, but they're not dried out anymore.

You'll love your shiny, soft, dandruff free hair! If you try these recipes, I'd love to know how they work for you. Now that you have the recipes you can head to the store and grab whatever ingredients you don't have on hand in time for your next Spa Night. Enjoy!
Disclaimer: All homemade beauty products and results are based on my own use and experience. The facts included about these cupboard products are only a few benefits, there are many more amazing things they can add to at home skin/hair care. These are simply the reasons I started using them in the first place. Use responsibly. I cannot be held responsible for any allergic or adverse reactions experienced while using recommended ingredients.
--------------------------------------
Tutorial Tuesday: Homemade Facial Toner
like to make my own facial products when I can. Every Thursday, which I have claimed for my personal Spa Night, I use different homemade products depending on what I want to do that particular evening. Some Thursdays, I sprinkle homemade moisturizing bath salts into my foot soak, followed by a homemade foot scrub before I treat myself to a pedicure. I almost always do a homemade face scrub and mask on Thursdays, and like to do a deep conditioning oil treatment on my hair twice a month, but I'll save those recipes for a later post. Since the move, I haven't really made the time for my Spa Night and I can see the negative effects in my skin and hair. Today, I wanted to post one of my favorite homemade toner recipes. There are a lot of recipes out there but I like to use a tried and true mixture that works amazingly well for my crazy combination skin.
This is a recipe for a liquid toner that is meant for daily use. I just made a batch (my first in a long time) and it feels amazing on my stressed, broken out skin. Once my skin clears, I know this toner will help to keep it that way.
DAILY HEALING TONER
Ingredients:
3/4 cup Witch Hazel (available in the pharmacy section at WalMart near the rubbing alcohol). Witch Hazel will eventually help to tighten and reduce the appearance of pores so there will be less chance of clogs and damage to your pores.
2 drops of Tea Tree oil. Effectively treats and promotes healing in infections (pimples, blemishes). I got mine at Hobby Lobby for $6.
Water
1/4 cup Green Tea. It has healing, and supposedly anti-aging properties and soothes my irritated skin.
2 Tablespoons Apple Cider Vinegar or White Vinegar. A natural astringent for cleansing gunk from your pores, but gentler than the chemical kind.
Favorite moisturizer
Directions:
-Boil water and steep 1/4 cup of green tea. Set aside to cool.
-In a bottle of your choice, add cooled green tea to witch hazel.
-Add tea tree oil and vinegar. Shake well.
-Apply to freshly cleansed face and neck with a cotton pad or clean washcloth. Let dry and apply moisturizer.
-Store in refrigerator. Shake well before each use. Great to remove excess oil throughout the day, after exercise, etc. Normal use would be once or twice a day, but especially at night after cleansing.
My toner made with this recipe. Fresh out of the fridge, shaken up and ready to apply.

I'll be sharing more of my homemade spa recipes in the future. Hope you get to try this! It's economical, all natural and doesn't have any harsh chemicals in it. I'm not an expert, but I have been using my own products for a long time and have loved the results. If you have any questions for recipes for different types of skin or a particular beauty problem, ask me and I'll do my best to find the right combination of ingredients for you. Happy Tuesday, people!
