We are all inventors, each sailing out on a voyage of discovery, guided each by a private chart, of which there is no duplicate. The world is all gates, all opportunities.
Ralph Waldo Emerson

Showing posts with label DIY. Show all posts

Monday, August 23, 2010

Dollar Tree Mirror Redo

One Dollar Tree mirror that has never quite fit in.
Forgive my smudgy prints all over it :) 


Add some pretty sea glass I found on clearance at Michaels. Oh, Michaels, you addicting store!
It didn't turn out how I wanted, and you could see the hot glue through the pieces of glass.


Then I remembered how much I loved Laurie @ Scene of the Grime's seashell encrusted mirror.
So I added another layer, this time with Mod Podge.
 Et voila!


Methinks I love it.


Along with my slightly embellished starfish plaque, I'm on my way to collecting beachy decor for the master bedroom. Now to figure out where to put it.
Thanks, Laurie for the inspiration!


Do you have a themed room that you're collecting loot for?

Linked to:


Keeping It Simple

Monday, July 26, 2010

Tutorial Tuesday: Tiebacks that Aren't 7/27/2010

I was so frustrated with these tiebacks! I suppose they looked different in my head. 

Anyway, here's the tutorial which I do not recommend you follow unless you want ridiculously off kilter tiebacks:


STEP 1: Gather your materials


STEP 2: Half-heartedly chop up your gorgeous heavy silk and wince with every cut.
I measured the length with my flower embellished guest bath tiebacks.


STEP 3: Plan out how you want it to look and fold accordingly.


STEP 4: Use fusible web and a hot iron to seal the folds and hold that shape.


STEP 5: Look doubtfully at your finished product.


STEP 6: Tie into place.

Bleh.

Pin into place.
Yes, I know the right one is lower. Still blah and the tiebacks are literally slipping off the too thin curtains.


STEP 7: Fold one row of the pattern to slim it down a bit and pin one tieback into place around both curtains. 
I thought the bit of green in the silk would pop against the deep green drapes. 
Maybe it's the width that's throwing it off for me. Or the texture? I don't know. I just know I don't like them much as tiebacks.


STEP 8: Realize you are so not happy with this in any way, but that it will have to do until further inspiration strikes.
At least with both drapes bunched together like that, the tieback isn't slipping down.


STEP 9: Decide to use the extra tieback as a mini runner under a decorative bowl and call it a day.
I quite like it as a runner! And it does have some gorgeous peacock colors going on. I may just have to give the tiebacks another go with a totally different fabric and be content with my two mini runners. We'll see.
There's beauty even in failure.

I'm linking to:

Tuesday, July 20, 2010

Tutorial Tuesday: Homemade Spackle 7/20/2010

Here's a favorite household tip I gleaned from my Grandpa Roy. One of the many tricks a military family learns having to constantly move from place to place :). This recipe was a life saver when we moved into our first dinky dingy apartment and the entire place was covered with holes from previous tenants. It seems to work best on small nail holes (no matter how many) and thin wall cracks. Of course it won't restore the integrity of the wall (when you find that super spackle that does, call me! ), but it will at least look nicer. 

Homemade Spackle
2 Tbs salt
2 Tbs cornstarch or flour
4-5 tsp water

-STEP 1: In a small container, combine ingredients to make a thick, pliable paste. 

Some people like to add paint at this point, to match whatever wall they're patching. My experience has taught me that painting after is more reliable. For some reason, the pre-colored paste looks slightly off when it dries, in which case you'll just repaint it anyway. 

So save the headache, unless you're totally awesome and it turns out for you. In which case, I'd be jealous, but I digress...

-STEP 2: Fill hole and let dry. 
I just pat it on with a finger.


Still wet, just after application. Fortunately, the apartment walls are textured to hide the abuse of many tenants, so the lumpy-ness works.

-STEP 3: If necessary, smooth with fine grade sand paper. Surface can now be painted to match the rest of the wall. 

Oddly, my lumpy paste matched the wall's texture and color, so I didn't need to do any finishing. Very nice!  


Oh my, a way to upgrade the look of your holey walls and save money? I think I shall swoon! After I hang some shelves.... which you got a peek of in the photo above. Shelves to be revealed later :) 

Happy spackling!


I'm linking to

The Girl Creative

Tuesday, June 22, 2010

Tutorial Tuesday: How to Replace a Light Switch Plate

It seems the previous owner used a sprayer to paint all the rooms, including the light switches and outlets. Not a great look. To top it off, it is flat paint so it absorbed every smudge and print left by frequent use.

This was my very first time changing out switch plates, so I figured I'd document it.

STEP 1: Use a box cutter to cut through the paint attaching the plate to the wall. Do not cut into the drywall! Notice the angle of the blade. All that was needed was to separate the plate from the wall.

STEP 2: Using a screwdriver, remove the tiny screws and then lift off the plate.

STEP 3: Install the new plate with new screws, making sure it's straight. 
These took less than 2 minutes each. I can imagine how quickly it would go replacing plates that aren't fused to the wall with paint. 

Repeat on outlet covers.
You can see the switches and actual outlets are still caked with paint, but it looks a whole lot better. I was excited to do this little makeover! During my cleaning, I came across a bunch of these plates Hubby collected while he was working construction. I think it makes a big difference! Not perfect, but much better. Only a few more plates to go before I'm done with this little project.

I found remnants of a pretty (but dated) wallpaper under the kitchen light switch plates. I'm curious now what this place looked like originally.... it has me daydreaming about the people who may have lived here.

Well... back to the grindstone. I get to see my man soon! Yay!!

Friday, June 18, 2010

Friday Inspiration

Back again for a few things that sparked an idea in me this week. I'm going to have more inspiration than I know what to do with once I get back home!

I love this simple idea to use a cereal box for a drawer organizer. That's my kind of usable craft! Once I get back home, I think I'll make some of these for our resident junk drawer while I finish up my snack box storage crafts (started in this post).


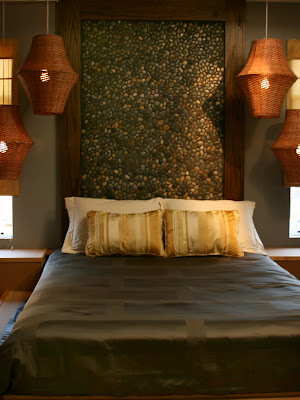
I love the hanging lamps in this HGTV zen bedroom.

I don't remember where I first saw these beautiful plates, but I just love the bright swirly accents on the white background.
Very similar to some in Veranda's spring table settings.
I'd like to use the unusual color combo in it some how to accent the master bedroom, I think. I'm already using teal/turquoise. Soft pink, coral red and mahogany will be gorgeous accents to the main color palette of teal and cream.

Amy at Positively Splendid has a tutorial for homemade citronella candles that had the crafter/candle lover within jumping for joy. They are super easy and so pretty!
I can't wait to get some citronella oil and make a few for our outdoor space (and maybe a few pretty smelling ones for the apartment!) when I get home.

If something catches your eye, or makes you wish you had such a great looking space/accessory/furniture, use it as inspiration! Draw on things that make you happy and encourage peace of mind and surround yourself with them. It's even possible on a budget! At least, that's the thought that keeps me planning and working to slowly transform our home as best I can with what we have. Here's to the weekend that's peeking around the corner!

Monday, May 24, 2010

Project List

So, I've had this list of projects for a while, but have only now decided to post them here on the blog sidebar. I have a few completed and will post photos of those projects as the days go by. I'll be linking the items in the list to their respective posts as I get them done. I actually have one to post today. Yay! Here's to learning and bettering myself, my home and family throughout 2010!

Thursday, May 20, 2010

Peaceful Space Inspiration

Now that I am no longer surrounded by the clutter that comes with moving from a house to a little apartment, I can focus on making our rooms conducive to relaxing. It's going to take lots of planning and a little ingenuity, but I'm excited about it! I'm hoping to have at least the beginning of projects to show for it when next week rolls around. Here's a little peek, though:

Living room inspiration: Peacock color palette with Polynesian patterns.
I have a vague idea of how to implement this, and I really hope it all comes together! I'm nervous about it though because everything might not work as a whole, but oh well. There's only one way to find out, right?
Tapa designs. I love the traditional designs of my culture, but I'd like to create my personal interpretation of them using traditional shapes and one of my favorite palettes: peacock colors.

Guest bathroom inspiration: Maroon powder room. Elegant and feminine. I'm thinking luxury and velvet like these drapes below. The femininity will hopefully be balanced with the deep strong maroon color. That's what I want, anyway. We shall see what we can come up with.


The cottage look above isn't me, but I adore the idea of personalizing the area around the mirror by draping some fabric. It adds a feminine touch too, I think. I don't know how I would do this, but I love it.


Master bedroom inspiration: Resort Spa. I imagine teal like the ocean and tan like the South Pacific sand; a peaceful, light space with soft colors of the ocean incorporated throughout the room. I want to feel like I'm on a getaway at a fabulous, relaxing spa resort while staying away from nautical or overdone seashell themes.

I love the thought of sheer curtains at every corner of the bed. So luxurious and resort-ish, isn't it? And it also makes me think of the sea breeze playing with the sheer fabric and the tropical sunlight shining through. We don't own a canopy or four poster bed, but I would like to use this somehow.

The combination of bamboo runner and candles is so lovely and relaxing.


These baskets remind me of honey colored wood that I saw everywhere on the island where I grew up. The gorgeous natural polished wood was crafted into supporting pillars in family meeting houses, or traditional tiny wooden benches that were used as pillows by the older generations of islanders. It just makes me think of home.


Master bath inspiration: Spa massage room. 
I see bamboo, tropical flowers and aromatherapy. 

I doubt I'll be able to afford a bamboo piece like this, let alone have the space to put it up in our little bathroom, but the clean lines and beautiful bamboo wood grain is inspiring. And I do need some sort of storage. Right now the only place to put things is in the double cabinet beneath the small sink.
Our master bath suffers from lack of towel storage as well. I like this idea...maybe not in a basket, though.

This, as well as the other candle/bamboo runner photo in the bedroom inspiration is the sense of calm and pampering and tropics that I would like to have in the bed and bathroom.

Whew! I love having all this together so I'll have a visual reference as I work on adding these touches to each room. Our toddler's room is the only one that is on track with it's theme, which is Learning Playroom. It definitely needs tweaking, but it has everything he needs, unlike the rest of the rooms. So, I decided to focus on slowly bringing the rest of the apartment along before I do anymore to the nursery. After all, the adult spaces need to be inviting too! We are not allowed to paint, which makes it even harder to add personality on a budget. At least I can look back at this and refocus once I get going. It's easy to get lost in a redesign, no matter how small it is, but now I'll have my inspiration post to help me get back on track. Don't forget to check out tonight's Spa Night post on a homemade acne spot treatment!

Start Swagging!

Recommended reading and other products...