We are all inventors, each sailing out on a voyage of discovery, guided each by a private chart, of which there is no duplicate. The world is all gates, all opportunities.
Ralph Waldo Emerson

Showing posts with label Spa Night. Show all posts

Thursday, April 7, 2011

Chocolate Biscotti

I made chocolate biscotti for the first time last week. It was fabulously easy with this recipe my SIL posted a while back. Hope you get to try it! It's ridiculously scrumptious with coffee or tea...


This was a part of Hubby's gifts during his birthday week :) We're enjoying the excuse to sit down with a cuppa more often so we can have some biscotti. Yum.

Today I'm out on the balcony potting plants in the gorgeous warm weather. It's about time Spring decided to stick around and Baby Boy and I are loving being outside! We spend lots of time out there during the warm months. With the typical apartment lack of a yard, it's the perfect relaxing spot for me and play space for Baby Boy.

I'll be taking some time to work on my hair (still haven't dyed it yet...procrastinator) and hopefully get a foot soak in this evening. Hope you choose to pamper yourself a little today... You deserve some guilt free relaxation. Happy Spa Night, Beauties!

Thursday, March 31, 2011

Spa Night: False Lashes Daydreaming

I LOVE false eyelashes. Or I used to. Now I love the idea of them and daydream about those good old days when I used to wear them. Here's a quick history about me and falsies.

No falsies, Baby Boy was 3 months old.

Me lately looking at my funny boy in the mirror. No falsies. I miss 'em!

The following photos are all of me wearing natural looking false lashes. I worked very hard (trimming, careful application, etc) to make it look inconspicuous and eventually wore them almost every day because with all that practice, it took me no time at all to apply them. I wanted to wear them for Hubby and my anniversary dinner last year and was frustrated to find that I'd lost the knack! Well, after over 2 years of not wearing them, I guess that's normal. My girly heart was sad, though. Anyway, here's a short collection of some falsie pics. And it's no coincidence that they are all pre-baby :)

Wedding day. I was absolutely wearing them that day! Here I have a mix of soft black and brown lashes with a sheer golden shadow on my eyes. I was really happy with how the brown lashes and gold shadow made my baby browns pop. Plus, we had a great photographer who I'm sure helped me along in the editing department *wink*

Married nearly a year. Very subtle top lash falsies in black.

Pregnant with Baby Boy! Black falsies on the outer corners of my top lids.

7 months pregnant with Baby Boy. Black falsies on my lower lids. They don't just belong on the top! I loved changing it up with wearing some only on the bottom lid sometimes.
I'm with my niece Dianna. Isn't she beautiful?

So... all that to say, I know I'm about to have a child in the next 4 weeks and will probably have even less time to get prettified in the mornings, but I want to wear falsies again! I just bought 10 pair on ebay for about 14 cents each. Ooh yeah. Gotta love buying in bulk from across the pond :) Anyway, I figure when I have the time I won't feel guilty about messing them up while I practice.

For tonight's spa night I'm doing a foot soak, repairing one of my finger nails (yes! I broke one already! So soon after my spa visit. grrrr) and dyeing my hair. Oh hush, it's ammonia free dye and temporary, so don't get all worried for Baby Belly. I'm just trying out a slightly lighter shade of brunette.

What will you do to pamper yourself this week? Take the time... you won't regret it and your family will appreciate not dealing with Mama bear all week :) Have a fabulous Spa Night, Beauties!

Wednesday, March 30, 2011

Trip to the Spa


I've been needing some stress free time and have been really wanting a pedicure for some time now. I can no longer do my at home pedicure this far along in pregnancy and the sight of my non-pampered feet was kind of driving me nuts. Yesterday was Hubby's day off so I eagerly looked over a menu of spa services and was excited with the idea of a 60 minute pedicure. Then my wonderful man told me to go ahead and get a few more services I've been wanting. Woohoo! One phone call later and I was booked for a 60 min pedicure, 60 min manicure and 30 min prenatal massage :) I couldn't wait!

When my appointment time rolled around, the boys dropped me off (I didn't want to drive afterward and risk messing up my nails. Ha!). And of course, I took my camera :) This documented trip's for you, Mom! I missed you so much while I was soaking up all the relaxation. You would've loved it! We so have to go there the next time you're in town.

Arriving at Oasis....


In the spa area... Pick a robe and some sandals and head to the changing room.

Time to choose a locker and get changed.


In my locker. Buh-bye cell phone! I'll be ignoring you for the next three hours. 

So if feet in general gross you out, just look away.  But my mama had to see the state my poor feet were in :) 
Before. A sad remnant of my last at home pedicure.....

Ready to get my spa on :). 
Of course, they didn't have maternity robes. So glad I took a swimsuit cover up just in case! I used the robe tie to accent my preggo belly so I wouldn't look like a blob and just kept the too small robe open over my cover up dress. I got lots of compliments from the workers there and several of my fellow spa goers in their tied up robes told me "I didn't know we could wear a cute cover up under the robe! I'm doing that next time." Also much commented on were my gray Old Navy flip flops, of which customers also said they didn't know you could bring your own. But I'm paranoid of much used public spaces and sharing shoes. Yuck! 

Spa waiting area. There was a juice and coffee bar on the other wall, but my photo didn't turn out.

Loved waiting in this dimly lit cozy area.

Private massage room. That pregnancy pillow was amazing! No strain on my back and I could lie on my belly without smashing Baby Belly. I'm sure he appreciated it. I was off in happy land for 30 minutes while I had the stress worked out of me as I listened to artfully arranged rainforest and beach noises over the room speakers. 

The massage ended all too soon, but it was heavenly! My back hurt once I got up from the table, but in a few minutes my joints all snapped back into place and I felt like all the stress I had been carrying just melted away. I could have honestly curled up on that table and fallen asleep right there. But my masseuse gently guided me down the hall to meet my nail technician. I had to laugh later. The masseuse must have lots of experience herding sleepy guests from the massage rooms!

After the 60 minute manicure, which included a yummy smelling sugar scrub & lovely hand/arm massage, I felt so amazingly relaxed. I walked in a dream like state to my cushy pedicure throne where my technician had a warm foot bath, some magazines and water waiting for me. Oh my word! I wanted to move in there :)
I couldn't get a good shot of my manicure. The gray days here make the light tricky for the almost sheer polish. But here's a swatch of the exact shade I have on my finger nails. Pink, of course :)


Another 60 minutes later.
Happier feet! Freshly soaked, scrubbed, lotioned, trimmed, buffed and polished. Yeah, baby! 
The bubbling soak and foot/calf massage while I sat in the heated auto massage chair had me falling asleep. 
Ooh, I LOVE hot pink polish for toes.


I don't want to leave.....!!!! Hahaaa.. Apparently, there's a hot tub and steam room that is complimentary for any guest having any spa service done. Will have to remember to pack a swim suit for that for next time. Oh yes, there will definitely be a next time.

My boys picked me up and took me to dinner. Yum. Here's the apple dumpling dessert Hubby and I shared.

Yes, we're wimps. We couldn't even finish it!

My lovely handsome wonderful family.

It was a beautifully relaxing day.

Thursday, February 3, 2011

Spa Night Beauty Tip: Beautifully Curled Lashes

I am a huge fan of curling lashes before applying mascara. I think it really pulls the eye upward, making you look more awake and definitely shows off your lashes better.

I use a normal lash curler, like the one pictured above. Nothing fancy. You can find it for a couple dollars at WalMart, Target, or Walgreens. Whatever mass merchandise retailer you shop at, really. The problem is, people don't know how to use one to the best effect.

There are several ways to get those va-va-voom lashes. You just have to give 'em a go and figure out which one's right for you.

Method 1: Swipe, Curl, Swipe
- Put a light coat of mascara on.
-Immediately curl your lashes. Don't let the mascara dry. 10 is the golden number for lashes. Hold lashes in curler for 10 seconds before releasing.
-Add last coat(s) of mascara for pretty flirty lashes.

Method 2: Curl and Swipe
-Curl clean lashes. Remember 10 seconds at least!
-Apply your usual coats of mascara for a more subtle, but defined lash line.

Method 3: Heat it Up, Baby! (My all time favorite)
-With your blow dryer on low heat, give your lash curler a 10 second warm up. No more. You don't want to burn your eyes! I still test it with my fingers before applying it to my lashes, just in case.
-Curl lashes with the warm curler for 10 seconds.
-Immediately apply your usual coats of mascara for a very defined and come hither look. No falsies required.

I've used this trick successfully on so many unsuspecting people: girls going to prom, college gals going to a formal event, my sis on her wedding day... Ha! And you know what? It works.
The heating method can make a cheaper mascara go from blah to gorgeous! I use it mostly for date nights but whenever I have some extra time while getting ready and am feeling a little sassy, I heat it on up.

If you try any of these, let me know which worked best for you.
Have a lash luscious Spa Night, Beauties!

Monday, August 30, 2010

Missing Your Weekly Spa Fix?

Treat yourself to a new recipe: Frozen Honey Mayonnaise Mask @ Adventures of a Wannabe Cheapskate. It's easy to make, good for many uses and is amazingly cheap! My favorite kind of homemade spa treatment.

I'll leave you with some photos of my island home. Well, of the pretty tropical foliage, anyway. Always relaxes me...
American Samoa...a bend in the road. Always intriguing.

Don't you love the bit of truck bed in the shot?
A great memory for me, though. I took many of these
riding in the back of a truck enjoying the South Pacific
breezes.

Thursday, August 19, 2010

Spa Night: Homemade Conditioner for Hair Growth


My wonderful friend and sis Rachel @ Raznoggle.com sent me the link for this homemade hair conditioner. I don't have all the ingredients, but will definitely be trying this when I do. Check your cabinets! You might be able to do this for your spa night, and if you do, please let me know how you liked it.


Homemade Conditioner - For hair growth
Things You'll Need:


  • 1/4 cup of plain natural yogurt


  • 1 egg yolk


  • 1 tsp. fresh lemon juice


  • 8 to 10 drops of eucalyptus oil

Directions:


  • Place the natural yogurt in a small bowl. Yogurt is not only the creamy base of your natural conditioner, but it is also a gentle cleansing agent that will help to clear pores. Yogurt has natural anti-fungal and anti-bacterial properties that will gently wash away the dirt and grime that inhibits hair growth.


  • Separate the egg white from the yolk and add the yolk to the yogurt. Egg yolk is a natural and deep-penetrating moisturizer that will not only make your hair silky smooth, but also help add elasticity and strength, so that as your hair grows it will break less.


  • Add 1 tsp. of fresh lemon juice to the mixture. Lemon is a natural astringent that will help to remove shampoo and product build-up. Lemon, the same pH as your hair's natural oil, can help protect and seal the hair's cuticle, preventing split ends.


  • Mix in 8 to 10 drops of eucalyptus oil and stir until creamy. Eucalyptus oil has a cool, refreshing effect on the skin and will help to stimulate blood circulation on the scalp, encouraging hair growth.


  • Wet your hair thoroughly and apply the conditioner. Massage the conditioner into your scalp gently for at least five minutes. For deep penetrating conditioning, you can wrap your head in a towel and allow the treatment to set for 20 to 30 minutes. When ready, rinse your hair and towel dry.


  • Click here to be taken to the original eHow article.

    Have you taken some time to relax this week? I admit I really need to get my spa night in, it's been a long week!

    Psst... thanks, Rachel for the recipe! I can't wait to try it.

    Happy pampering!

    Sunday, August 15, 2010

    Wannabe a Cheapskate?

    Check out my SIL Barbie's wonderful money saving blog Wannabe Cheapskate, where she shares her forays into super coupon shopping and saving money for her family. Barbie is the reason I was brave enough to try coupon shopping for myself and I'm so glad I did! You can be sure that as soon as I get transportation again, I will be planning a couponing trip to get rid of these withdrawals once and for all. Yes, it's addictive. In a great way.

    Barbie will be featuring weekly homemade spa recipes (by moi!), cheapskate style! Although I will continue my Thursday spa night posts (I can't survive without them!), the cheapskate recipes will not be repeated here on Beauty and Inspiration. Which is great for you because now you'll be getting TWO spa recipes every week! So please make sure to check out Wannabe Cheapskate regularly for more beautifully frugal spa posts via yours truly. Today you can read my post for Cucumber Conditioning Treatment over at Wannabe Cheapskate.  I know you'll enjoy reading about Barbie's awesome deals and maybe pick up some tips for your next shopping trip! She's living proof that you can be a busy wife and mom, have a blossoming career in teaching and save serious money at the same time. Truly inspirational.

    So add that cucumber spa recipe to your homemade repertoire, read up on the Cheapskate posts you've missed and get ready for a fabulous week, you beautiful people!

    Thursday, August 12, 2010

    Spa Night: Easy Homemade Sugar Scrub

    My easy recipe for a sugar scrub.
    1 cup salt or 1 cup granulated sugar
    2 Tbs olive oil or liquid coconut oil
    2 tsp honey
    3-5 drops of essential oil  of your choice (optional for added benefit)

    -Mix all ingredients well to evenly distribute the honey and oil.
    Think of the lucky dates he will wow with his fabulous spa gifts ;)


    Aahhhh.... I love the smell of brown sugar. 


              -Transfer to tightly lidded container of your choice.
    That's it! Look at you, you fabulous homemade beauty! Can you believe you used to pay for this??
    Hey, with a name like Smucker's it has to be good, right?
    Come back tomorrow for a post on how to get those annoying labels off your recycled jam jar. The easy way!

    -For a thinner scrub, add more liquid ingredients a bit at a time until it reaches the desired consistency.

    Great on rough spots (knees, elbows and feet) and safe for facial exfoliation too!
    NOTE: As with any scrub, be very gentle on sensitive areas around the eyes and nose.

    FUN FACTS: 
    -I added the honey to work as a natural preservative and skin softener and it works amazingly well. This scrub will keep for months and travels well if you want to ship a batch as a gift. 

    -Salt is great as a scrub, but I prefer sugar because it's not as drying to my skin.

    -Olive and coconut oils have been used for centuries as a natural conditioner for both skin and hair. Knowing how to use oils in your beauty treatments can give you a beautiful healthy glow! Click here to read about a way to use these oils instead of chemical laden face washes. That's right, oil to cleanse your face!


    This is a basic scrub and you can build on it any way you wish.
    As you get more comfortable making it, you can add food coloring to a scrub made with white sugar for a fun presentation. For a little more luxury, add dried herbs and a drop or two of fragrance and essential oils.

    Be careful with fragrance and essential oils in a face scrub. A tiny bit is enough! Too much can cause break outs. Fragrance oils are delicious in body scrubs, though and the right scent can enhance the spa experience.

    Who says you have to pay a lot for that luxurious body scrub at the store? Make your own for pennies and enjoy creating your very own homemade spa! Hey, you don't even have to drive there!

    Have you taken time out for yourself this week? I guarantee, you won't regret it.
    Happy pampering, Beauties!

    PS
    Many of you amazing people already know how to make sugar scrub. What are your favorite ingredients?

    Thursday, August 5, 2010

    Spa Night: Rice Water Toner with a Cheapskate Twist! 8/05/2010

    I wanted to share this amazingly simple but exponentially brilliant tip sent to me by Barbie @ Adventures of a Wannabe Cheapskate. Remember how much I love Rice Water Toner? You'll also remember how it usually keeps only for a few days so I added tea tree oil to mine, which enabled usage for up to two and a half weeks with no problems. Alright, there's one problem. Tea tree oil is expensive! Well, Barbie came up with a different (and cheaper!) way to make her Rice Water Toner last. In the freezer! No kidding. Awesome, right? Since learning this tip, I am able to save my tea tree oil for other projects and can still enjoy the benefits of rice water! Here it is, in her own words:
    I wanted to tell you how much I love the rice water toner.... I tried it, and really like it. I ran out and didn't make any for a while, and I can really tell the difference. I made it a priority recently to make some more. I don't have tea tree oil... When I made it most recently, I poured it into an ice cube tray and froze it. When it was completely frozen, I emptied the tray into a ziploc and stored that in the freezer. I take one ice cube out and put it in a cup in the fridge to melt overnight. I find that the ice cube size is just right for a morning and evening use. So, that's my own cheapskate twist on rice water toner. I love it! And I love that super cold feeling of fresh-from-the-fridge toner. Everybody should keep their toner (no matter what kind they use) in the freezer!

    I totally agree, Barbie! I always kept my Healing Toner in the fridge. Even when I used plain witch hazel, it was stored in the fridge for that fresh, cool feeling. I love Barbie's tip because it's so practical, which is what beauty treatments need to be when you're busy enjoying life. So, thanks for the great tip! It has made having my rice water even more frugal and it lasts a whole lot longer.

    Using the rice water ice cubes has been a huge time saver for me! I love to swipe the ice cube over my clean skin in the morning for a refreshing wake up call that's good for my skin too. Using it this way in also helps to reduce my morning companion: puffy eyes. I use half of it in the morning and toss the rest of the ice cube into a ziptop snack bag back in the freezer.
    In the evening, to finish off my Oil Cleansing Method, I swipe the rest of the ice cube over my face and neck until it's gone. Aaahhh.... very relaxing.


    Do you love homemade skincare? If something doesn't work at first, tweak it! You might find a fabulous new way that works for your unique skin situation. Or maybe, like Barbie, you'll find an all around better way of doing things. That's what is so wonderful about making your own products. You can adjust ingredients, preparation, and consistency to suit you. And that, my friend is a beautiful thing!

    I'm linking to:
    giveaways

    Thursday, July 29, 2010

    Spa Night: Oil for Facial Cleansing 7/29/2010

    WARNING: A few people, including myself had less than stellar results with the Oil Cleansing Method (OCM). Click Here to read my two posts explaining why I eventually gave up OCM.

    Using oil instead of soap to cleanse your face? This website is filled with extensive information on this ancient but now almost unheard of method for clear, beautiful skin! I found that reading what people who have actually used it are saying has been helpful too. The idea that something so simple could be so much better than all the technologically advanced cleansers we have now is definitely enough to pique my interest.

    Here are some of the questions I initially had and the answers I've found:


    How is the cleansing done?
    ~A quarter sized amount of natural oil is massaged vigorously onto face for at least 5 minutes. This motion loosens the hardened material in enlarged pores and with continued use will remove them completely. 

    ~Makeup doesn't even need to be removed before doing this, the oil will remove it, even mascara.

    ~Once the massage is over, gently wipe the oil off with a hot steamy washcloth, rinsing the towel and wiping until all oil is removed. This is important. Remove all of the oil, even if you didn't wear makeup. The oil on your face is now dirty and leaving it on your face might cause more problems.
     That's it. No need to rinse. Toner and a bit of clean oil as moisturizer and you're ready for bed.

    ~In the morning, use a clean washcloth to gently wash your face with water only. 


    How often is this done in order to see results?
    ~Once a day before bedtime. 


    Why oil?
    ~The whole premise is that commercial facial cleansers strip skin of it's natural oils. In response, skin overcompensates by producing too much oil which clogs and enlarges pores. 

    ~The oil used is pure and natural and extremely good for skin care. Castor oil, extra virgin olive oil, virgin coconut oil, etc.

    ~Oil gently cleanses the pores by loosening built up dirt and oil clogging the pores. Removing these blemishes without stripping moisture from the face is key! Facial skin is left invigorated (from the massage) and gently deep cleaned. 


    Does it work?
    Many people have seen significant improvement in their skin with the Oil Cleansing Method (OCM) including: 
    Disappearance of blemishes
    Even skin tone
    Unbelievably soft skin
    Disappearance of blackheads/whiteheads
    Reduced dark circles under eyes
    Plumper, younger looking skin


    What type of skin has it worked for?
    Combination skin
    Normal skin
    Oily skin
    Acne prone skin
    Diagnosed rosacea
    Sufferers of psoriasis


    So what are your thoughts? Would you try it? 

    Yesterday was my second day on OCM (using virgin coconut oil. Thanks to my awesome Mom!) and I'm excited to already see results. My pores are shrinking and unclogging, the whole kaboodle. I have combination skin. Very oily in the Tzone with very dry patches scattered everywhere else. As my skin is adjusting to not being dried out or overproducing oil, I'm happy to see my Tzone isn't so oily and there are definitely no more scaly dry patches! After two days! So, needless to say, I'm sticking with it and hoping for much better long term results.

    UPDATE: Read my review on this amazing cleansing method here!

    Thursday, July 15, 2010

    Spa Night: Brightening Mask

    Here I am with my mom, who was such an amazing good sport during her recent visit. She got a crash course in homemade relaxation! It was tons of fun and we got amazing results. I've used the mask pictured here before, but never posted the recipe, so here it is, a homemade brightening mask.

    Brightening Mask
    -1/4 cup plain yogurt (ooh, homemade yogurt comes in handy!)
    -2 Tbs honey
    -1/2 tsp turmeric
    -flour

    STEP 1: In a small bowl, combine yogurt, honey and turmeric until well combined.
    STEP 2: Add a teaspoon of flour at a time, stirring after each, to form a thick spreadable paste. Think facial masks you buy in the store and go for that consistency, like thick mayonnaise.
    STEP 3: Apply evenly over freshly washed face, massaging into skin. Let dry for 10-15 minutes as flour tightens the mask.
    STEP 4: When dry, remove the mask by scrubbing with a warm, moist washcloth. This is an extra polishing step, removing dead skin cells. Rinse well and apply your favorite toner and a gentle moisturizer. 
    Enjoy your brightened, smooth as silk skin!

    FUN FACTS:
    -The use of turmeric in facial masks has shown improvement in psoriasis and inflammatory skin conditions, evening out skin tone and promoting healing of open blemishes. Awesome, right? And there are a whole world of amazing things it does for your body when used regularly in cooking.
    -Honey is one of my favorite at home antibacterials and skin softening agents!
    -Yogurt is full of healthy bacteria and is another gentle softener.
    -Use this mask once a week for gradual, brightening results. 

    Don't forget to take time for yourself this week! Here's hoping you're able to grab a relaxing moment. Happy pampering!

    Wednesday, July 14, 2010

    Early Spa Night Post: Healing Liniment Recipe


    I played around with the ingredients in the Healing Toner, increasing the measurements to create a healing liniment for my dad. 

    The liniment worked really well in conjunction with my very first Healing Salve. I'd never made anything like that before and was so excited with how it turned out! Here's a peek at the salve made of:
    Beeswax, olive oil, vitamin E, tea tree oil, lavender essential oil, calendula and chamomile. Woohoo! Yes, seriously, those are all the ingredients. No chemicals! It was ultra healing and chock full of natural goodness. It smelled lovely, very natural and herbish and worked amazingly well. I love it so much that I'm going to make it regularly to use as diaper rash cream for Baby Boy. Anyway, not to get off topic, but I hope to post a recipe for the salve soon!


    Here's the Healing Liniment recipe if anyone wants to give it a try. 
    Enjoy!

    Healing Liniment
    -Freshly brewed green tea
    -Witch hazel
    -Tea tree oil
    -Water

    Just remember, 3-2-1.
    In a container of your choice, add 3 parts cooled green tea, 2 parts witch hazel and 1 part water.
    Add 1/2 tsp tea tree oil and shake well to combine
    Store in an air tight container in the fridge for up to 2 weeks. 
    Remember to shake well before each use to redistribute the tea tree oil, which will float on top after sitting. 
    Apply to freshly cleansed skin to heal, cool and soothe sore muscles or open wounds. 

    Easy, right? Here are some FUN FACTS:
    Tea tree oil- Natural antibacterial, and a gently powerful healing and cleansing oil.
    Witch hazel- Successfully used as pain relieving topical treatment for bruises, insect bites, sunburn, minor burns, poison ivy, hemorrhoids, varicose veins, stiff muscles and blemishes. Wow! Don't you just love this stuff?  
    NOTE: Guys, witch hazel is a fantastic natural aftershave. Ladies, on it's own it's an amazing toner you can use before makeup application or after makeup removal.
    Puffy eyes? Soak cotton pads in witch hazel and rest them on your closed eye lids for 10-15 minutes for a quick refresher.
    Green tea- Believed to have both healing and anti-aging properties.

    Let this serve as an early reminder to make time to relax this week! Happy future pampering!

    Thursday, July 1, 2010

    Spa Night: Nail Repair With a Tea Bag

    While packing boxes, I broke a nail. Ouch! I couldn't clip it without cutting into my skin so it was time for a repair. This technique has really come in handy, so I thought I'd share. 

    Here's what you'll need for a nail repair:

    -Nail polish remover & cotton pads
    -Nail hardener. Looks like regular clear nail polish, but will have 'nail hardener or nail strengthener' on the label.
    -Tea bag, emptied of tea
    -Scissors
    -Nail file
    -Nail buffer

    And here we go!
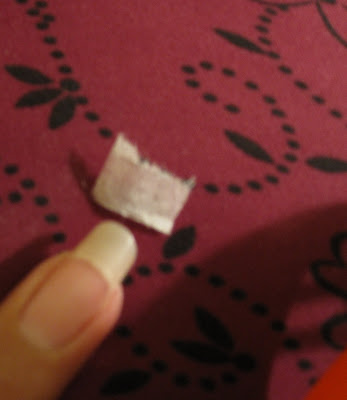
    Forgive the blurry photos... Can you see it? The tear goes from the side of my finger to more than halfway across my nail.

    Like my weird paint job? Last week I was trying out new nail polish colors. Hee hee...


    STEP 1: Clean your nail of any residue/polish with a swipe of nail polish remover on a cotton pad.

    STEP 2: Cut a piece of the teabag into a piece that roughly fits your nail.


    STEP 3: Cut that piece into just enough to cover the break.
    My scissors was dull :(


    STEP 4: Apply nail hardener to the break. Don't miss any spots.

    STEP 5: Place tea bag section over the break, gluing each part of the paper to nail with nail hardener. Smooth out any air bubbles and make sure the paper adheres well to the nail.


    STEP 6: Paint nail hardener over top of paper, sealing it further.
    Trim any edges hanging over the tip of nail or sides of finger.

    STEP 7: Once dry, buff the paper smooth and paint as usual (base coat, polish, top coat). It will blend in with the rest of your nail, but act as a splint to keep it from painfully snapping. Will last 1 to 2 weeks as your nail grows and you will be able to perform every day tasks without any problems or fear of breakage.

    I wasn't able to do the last step because I was in AR and my nail buffer was in MO, but it really does work. The next time I do it, I'll have to take a photo of the finished product.

    FUN FACTS: I've done this before for all my nails (unbroken) to make them stronger and less prone to breaking. I love this tip! Professional salon suppliers sell expensive papers to repair breaks, but a tea bag works just as well!

    Do NOT use regular clear nail polish for this. I guarantee, it won't hold.

    Don't forget to take time for yourself! Happy pampering :)

    Thursday, June 24, 2010

    Spa Night: Sweet Little Facial

    Tonight I was so dead tired, but still needed a little girly time to feel better about the long week. I don't have much on hand, but I came up with a sweet little facial and spent a blissful 20 minutes relaxing.

    Here's what I used for my

    Sweet Little Facial:
    -Honey
    -Favorite facial cleanser. I love this homemade castile soap bar, brought home from our South Pacific vacation last Christmas.
    -A teaspoon of granulated sugar.

    STEP 1: Lather Up! Using warm water to open up pores, lather up face and neck with cleanser.
    STEP 2: Exfoliate. Pour sugar into your hand and massage into face, using the suds to distribute it evenly. Apply light, even pressure, working all over around the hairline, eyes, nose and mouth. Don't forget the neck.
    STEP 3: Rinse well and pat dry.
    STEP 4: Apply honey as a mask all over face and neck, making sure to apply thinly on forehead, so it doesn't drip into your eyes as you let it set. Leave on for 15 minutes. Rinse and pat dry before applying toner and moisturizer.
    Enjoy your sweetly polished skin. Mine felt amazingly soft!

    I don't know why, but after doing this simple facial, I was so unbelievably relaxed. I think it shows that I definitely needed some down time! Here I am ready to fall asleep, I was so refreshed.


    With all that you do for others, don't forget to make time for yourself this week. It will be worth it. Happy pampering, you beautiful people!

    Start Swagging!

    Recommended reading and other products...